![Engagedly dark.png]](https://help.engagedly.com/hs-fs/hubfs/Engagedly%20dark.png?height=31&name=Engagedly%20dark.png)
Admins can configure stages and actions in a talent pipeline to define how candidates progress through the pipeline and standardize the development activities assigned at each stage.
Navigate to Apps > Talent Mobility > Talent Pipelines.
- Open a pipeline.
Ensure the “Stages” toggle is enabled at the top right. - Click the Settings icon at the top right.
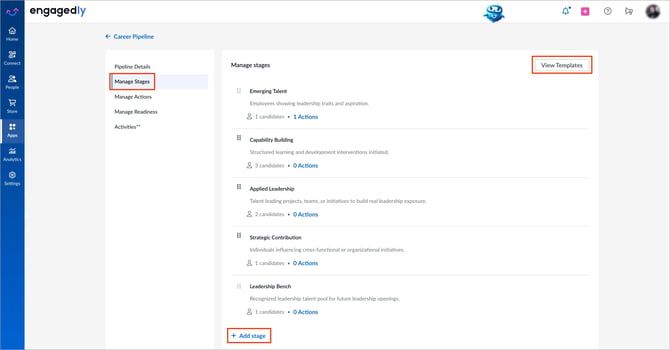
- In the left pane, go to Manage Stages.
- Click View Templates at the top right to preview stage templates. You can refer to the available templates and copy their stages and descriptions while customizing your own stages.
- Do one of the following as required:
- Click + Add stage to add another stage.
- Click the stage name or description to edit directly in the text field.
- To reorder stages, drag a stage using the Six Dot
 icon on the left.
 - To remove a stage, hover over it, click the Delete
 icon on the right. Refer to Configure actions for a stage.
Notes:
-
You can edit or delete stages.
-
You cannot delete or reorder the first and last stages.
-
You can modify stages at any time after creating the pipeline.
- When you remove a stage, you are prompted to move the candidates in that stage to another stage.
- Adding, removing, or reordering stages is recorded in the pipeline activity log. For more information, refer to View the pipeline activity log.
Configure actions for a stage
You can attach one or more actions to a stage. When a talent member enters that stage, the system automatically assigns these actions to them. This helps you standardize the development activities expected at each stage of the pipeline.
- Click the Settings
 icon at the top right.
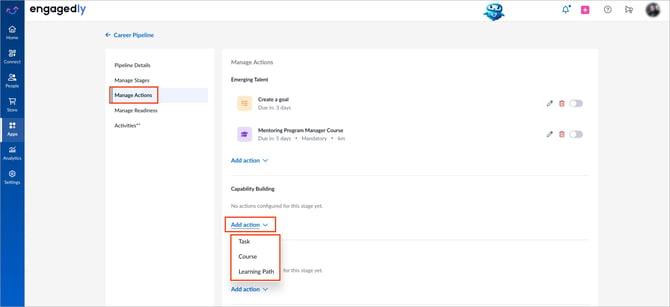
 - In the left pane, go to Manage Actions.
- Under the stage you want to configure, click Add action and select an action type:
- Task: Create a simple to-do.
I. Enter a title.
II. (Optional) Toggle Set due date and enter the number of days after assignment when the task is due.
III. Click Save.
- Course: Assign an existing learning course.
I. Search or filter by category.
II. Select the course.
III. (Optional) Toggle to mark the course mandatory.
IV. (Optional) Toggle Set due date and enter the number of days after assignment when the course is due.
V. Click Save details.
- Learning Path: Assign an existing learning path.
I. Search or filter by category.
II. Select the course.
III. (Optional) Toggle to mark the learning path mandatory.
IV. (Optional) Toggle Set due date and enter the number of days after assignment when the learning path is due.
V. Click Save details.
📒Note: Actions you add are automatically assigned to talent members who enter the stage and to talent members who are already in the stage.
Manage actions for a stage
After creating an action, it is inactive by default.
- Click the Pen
 icon to edit the action and make any necessary changes.
 - Click the Delete icon to delete the action and click Delete to confirm.
- Toggle to activate an action and click Activate to confirm.
⚠️ Warning: Deleting an action permanently removes it and all member progress associated with it. This action is irreversible. To temporarily deactivate an action without deleting it, turn off the toggle.