Table of contents
- Introduction
- Configuration
2.1. Generate credentials
2.2. Create the application
2.3. Enable SCIM provisioning - Default attribute mappings
3.1. Update required attributes - Add users
- Enable provisioning
1. Introduction
Microsoft Entra (formerly Azure AD) provides centralized identity and access management. Engagedly supports SCIM (System for Cross-domain Identity Management) provisioning, which automatically syncs user accounts between Microsoft Entra and Engagedly.
With this integration, admins manage users directly in Microsoft Entra. When they create, update, or deactivate users, Engagedly automatically reflects the changes. This automation reduces manual effort, improves data accuracy, and strengthens security and compliance.
Any users you assign to the Engagedly application:
- Automatically appear in Engagedly
- Update when profile details change
- Deactivate when removed or unassigned
Contact our support team to enable Microsoft Entra for your organization. After enabling, integrate it into your Engagedly account.
📒Note: This document covers the integration setup for both Tangerine (V2) and Indigo (V3). Screenshots are captured from Indigo (V3), so the user interface may vary slightly in Tangerine.
2. Configuration
Set up SCIM provisioning with Microsoft Entra and Engagedly to automatically sync user data across both platforms.
📒Note: Only admins or users with integration permissions can configure SCIM.
Prerequisites
- Admin access to both Microsoft Entra and Engagedly.
- Microsoft Entra enabled in Engagedly.
- Microsoft Entra Premium P1 or P2 license.
2.1. Generate credentials
After enabling the Microsoft Entra integration in Engagedly, generate SCIM credentials (base URL and token).
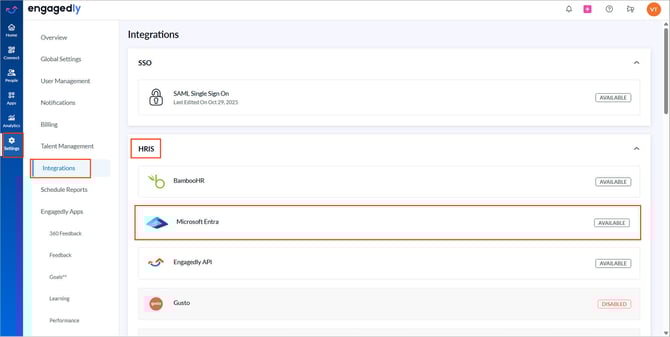
Navigate to Settings > Integrations in Engagedly.- In the “HRIS” section, click Microsoft Entra.
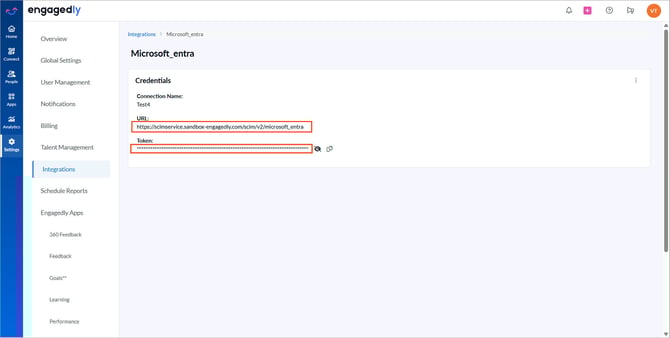
4. Click + Add Connection, enter a name, and then click Save.
Engagedly generates the base URL and token.
Manage connections
You can delete and recreate the connection at any time if required.
Click the Overflow ![]() Menu on the right side of the connection and select Delete to remove.
Menu on the right side of the connection and select Delete to remove.
📒Note: Syncing stops when the connection is deleted, but previously synced employees remain unaffected.
2.2 Create the application
After generating credentials in Engagedly, configure provisioning in Microsoft Entra.
- In Microsoft Entra, click the Hamburger
 Menu at the top left.
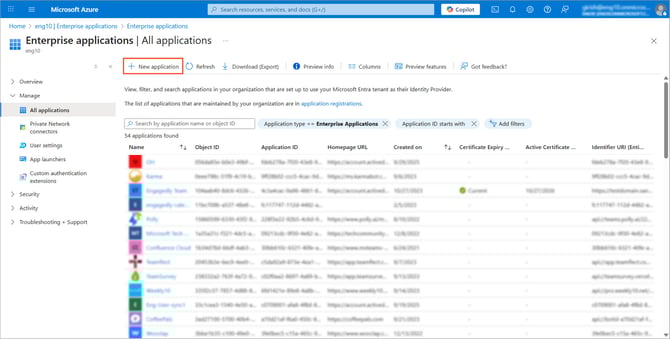
 - In the left panel, go to Microsoft Entra ID > Enterprise applications.
- Click + New application.
5. Click + Create your own application and enter a name.
6. Keep Integrate any other application you don’t find in the gallery selected.
7. Click Create.
2.3. Enable SCIM provisioning
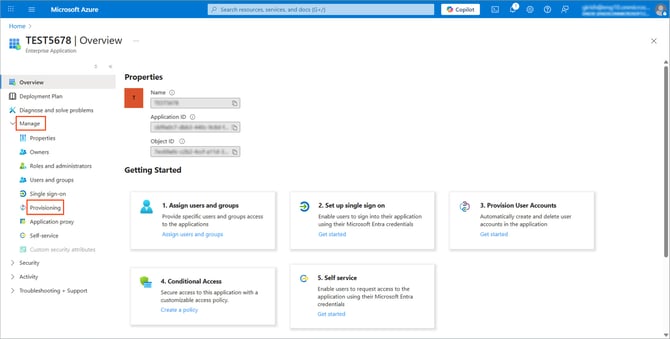
- Open the application you created.
- In the left panel, go to Manage > Provisioning.
3. Open + New configuration at the top.
4. Switch to your Engagedly account.
5. Go to Settings and select Integrations.
6. In the "HRIS" section, click Microsoft Entra.
📒Note: Ensure that the Microsoft Entra credentials are already generated on Engagedly. Refer to Generate credentials.
7. Copy the base URL and token from Engagedly generated earlier.
8. Return to Microsoft Entra and paste the base URL and token into the respective fields.
9. Click Test connection to verify the connection, and click Create.
📒Note: The sync fails if the base URL or token is incorrect.
The connection is established successfully.
3. Default attribute mappings
By default, the following attributes are mapped between Microsoft Entra and Engagedly:
|
Engagedly attributes |
Microsoft Entra attributes |
|
First Name |
First name |
|
Last Name |
Last name |
|
|
|
|
Job Title |
Job title |
|
Departments |
Department |
|
Reporting Manager |
Manager |
|
Employee ID |
Employee ID |
|
Location |
City |
📒Note: These are the default mappings. Contact our support team to customize or add additional attributes as required
3.1. Update required attributes
Update the following attributes to ensure Microsoft Entra values correctly sync with Engagedly.
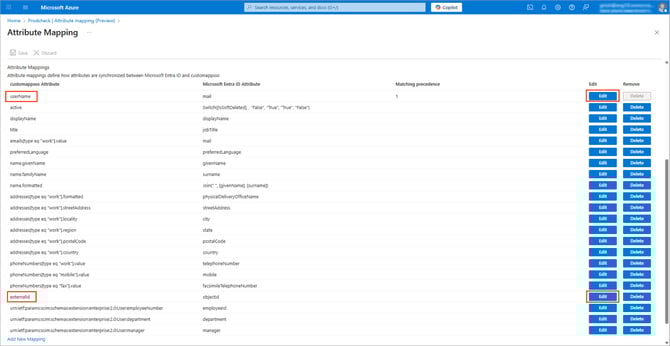
- Go to Provisioning > Attribute mapping.
- Click Provision Microsoft Entra ID Users.
- Scroll down to “Attribute Mappings”.
- For the “userName” attribute:
- Click Edit.
- In the “Source attribute” field, open the drop-down, select mail, and click Ok.
5. For the “externalId” attribute:
- Click Edit.
- In the “Source attribute” field, open the drop-down, select objectId, and click Ok.
6. Click Save at the top left.
📒Note: Ensure attributes in Microsoft Entra align with the corresponding attributes in Engagedly to avoid sync issues.
4. Add users
After configuring provisioning, add users to Microsoft Entra.
- Open the application you created.
- Go to Users and groups.
- Click + Add user/group and then click None Selected.
- Select the users or groups you want to provision and then click Select.
- Click Assign.
💡Tip: To add users in bulk, create a group, add users to the group, and assign the group to the application.
5. Enable provisioning
- Go to Provisioning and toggle the button to turn on the “Provisioning Status”.
- Go to Overview (Preview).
- Click Start provisioning and then click Yes to create the connection for the first time.
📒Note: If you pause provisioning, the sync stops. You must start provisioning again to resume it.
After activation, users appear in Engagedly.
The initial sync may take a few minutes. By default, Microsoft Entra runs sync every 40 minutes.
📒Note: When a user is removed or unassigned in Microsoft Entra, they are automatically deactivated in Engagedly.