Workflow automation enables you to automate HR processes by connecting workflow components into a sequence of automated steps. You can create a workflow in two ways:
Build manually: Add and configure each workflow component to create a custom workflow.
Build with AI: Describe the process you want to automate in plain language, and the AI Assistant generates the workflow structure for you.
Both approaches allow you to review, modify, and customize the workflow before enabling it.
Prerequisites
Before you create a workflow, ensure the following are in place:
- You have admin access to Engagedly.
- The courses, surveys, and email templates you plan to use are created and published.
- Employee profiles include accurate data such as department, manager, and job title.
Method 1: Create a workflow manually
Use this method when you need precise control over each step, condition, and delay in your workflow.
Step 1: Open the workflow builder
Navigate to Apps > Workflow > Workflows.
- Click + Create Workflow at the top right.
The workflow builder opens with a blank canvas.
Step 2: Name your workflow
- Click the Untitled Workflow field at the top of the page.
- Enter a name for the workflow.
- (Optional) Click Add a description and enter a brief description.
Step 3: Add a trigger
- Browse or search the trigger list from the trigger panel on the right.
Available triggers include:
| Trigger | Description |
| On user created | Executes when a new user account is created |
| On user field change | Executes when a user profile field is updated |
|
User profile updated |
Executes when department or user details change |
| Job title changed | Executes when a user's job title changes |
| Manager changed | Executes when a user's reporting manager changes |
| Course completed | Executes when a user completes a course |
| Learning path completed | Executes when a user completes a learning path |
| Scheduled trigger | Executes on a recurring or one-time schedule |
2. Click the trigger that matches your use case.
The system adds it to the canvas.
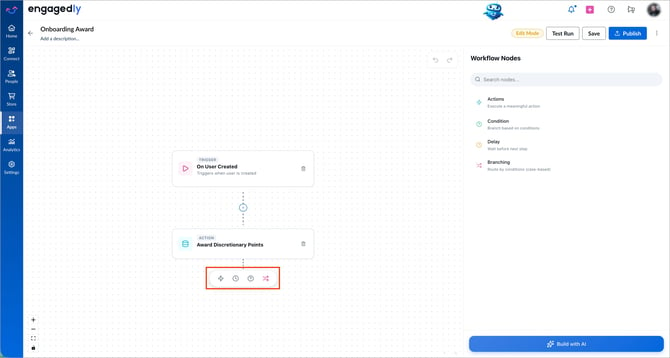
Step 4: Add nodes
After you add a trigger, use the node toolbar below the trigger to build the workflow.
The toolbar contains four node types:
| Node | Icon | Purpose |
| Action | Lighting bolt |
Executes a task such as assigning a course, sending an email, or assigning a survey |
| Delay | Clock |
Pauses the workflow for a set number of days before moving to the next step |
| Condition (If/Else) | Help |
Checks a rule and routes the workflow based on whether the condition is met |
| Branching (Case routing) | Arrows |
Routes the workflow across multiple paths based on case-based conditions |
-
Click the appropriate icon in the toolbar to add a node.
The node appears on the canvas, and the configuration panel opens on the right. Configure the node settings based on the selected node type.
Step 5: Configure action nodes
When you add an action node, select the action type from the configuration panel.
Available actions include:
- Assign Course: Assigns a course to the user; optionally set a due date.
- Assign Survey: Assigns a survey to the user.
- Send Email: Sends a custom email to specified recipients (To, CC, BCC).
- Assign Learning Path: Assigns a learning path to the user.
- Create Goal: Creates a goal for the user.
- Create IDP: Creates an IDP for the user.
- Award Badge / Points: Awards a badge or discretionary points.
- Create Task: Creates a task for the user.
- Send Webhook:
Step 6: Configure delay nodes
When you add a delay note, specify the duration for which the workflow execution pauses before continuing.
Step 7: Configure condition nodes
When you add a condition node, set the condition from the configuration panel.
- Click the condition node on the canvas.
- In the configuration panel, click + Group.
- Select a Field, Operator, and Value to define the condition.
- (Optional) Add multiple rules within a group.
- (Optional) Add multiple groups within the condition.
- Click Save Details.
📒Notes:
- Within a group, you cannot combine AND and OR filters.
- Between groups, you can use both AND and OR operators.
Step 8: Configure condition nodes
Conditions act as "only if" rules. They determine whether a workflow continues or which branch it follows based on the criteria you define.
📒Note: The workflow follows the first branch whose condition evaluates to true.
Step 9: Save and publish
- Click Save to save the workflow as a draft.
- Click Test Run to validate the workflow.
- When ready, click Publish to activate the workflow.
Notes:
-
Saved workflows that are not yet published appear under the “Draft” tab.
-
If the workflow contains errors, you cannot publish it. The system highlights the errors for correction.
Method 2: Create a workflow using AI
Use this method when you want to quickly generate a workflow structure from a plain-language description. The AI suggests the appropriate triggers, actions, delays, and conditions based on your input.
Step 1: Open the workflow builder
Navigate to Apps > Workflow > Workflows.
- Click + Create Workflow.
The workflow builder opens with a blank canvas.
Step 2: Name your workflow
- Click the Untitled Workflow field at the top of the page.
- Enter a name for the workflow.
- (Optional) Click Add a description and enter a brief description.
Step 3: Open the AI assistant
- Click Build with AI at the bottom of the right.
The AI assistant panel opens.
Step 4: Describe your workflow
- Enter a prompt describing the workflow you want to create, then click the Send
 icon.
icon.
Step 5: Review the AI suggestion
The AI processes your request and displays a suggested workflow structure with a list of nodes in sequence. Review the steps to confirm they match your requirements.
Step 6: Apply the suggested workflow
- Click Use this to apply the suggested structure to the canvas.
The system adds all nodes automatically. - Click each node to review and complete its configuration.
Note: The AI generates the workflow structure only. You must configure each node (for example, selecting a course or writing email content) before publishing.
Step 7: Save and publish
- Click Save to save the workflow as a draft.
- Click Test Run to validate the workflow.
- When ready, click Publish to activate the workflow.
After creating a workflow, you can validate it before it runs on live data. For more information, refer to Test a workflow.