Table of contents
- Introduction
- Integration process
- Default field mappings
- Set up Deel
- Authentication
- Sync employee accounts
- Sync process
- Sync status and reports
- Disable connection
1. Introduction
Integrating Deel with Engagedly allows admins to sync employee information, including custom fields, from Deel directly into Engagedly. The integration improves efficiency, streamlines administrative workflows, and ensures employee data stays accurate and up to date. It also helps reduce manual updates and maintain consistent employee records across both platforms. Learn more in Overview of integrations.
📒Note: This document covers the integration setup for both Tangerine (V2) and Indigo (V3). Screenshots are captured from Indigo (V3), so the user interface may vary slightly in Tangerine.
Prerequisites
- Admin access to both Deel and Engagedly.
2. Integration process
Contact our support team to enable Deel for your organization. Once enabled, the application status changes to “Available”, allowing you to proceed with the connection.
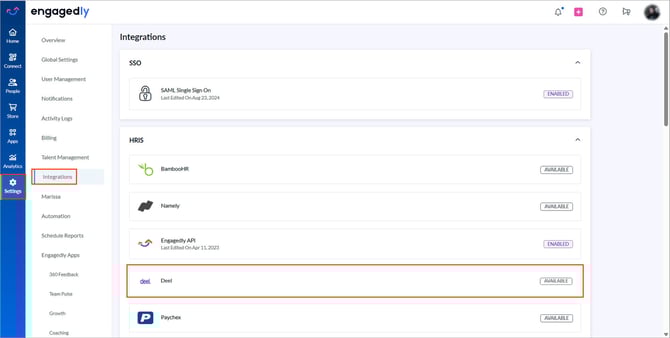
Navigate to Settings > Integrations in Engagedly to verify the status.
In the “HRIS” section, Deel appears as an available option.
3. Default field mappings
By default, the following fields are mapped between Deel and Engagedly:
|
Engagedly fields |
Deel fields |
|
First Name |
First Name |
|
Last Name |
Last Name |
|
|
|
|
Job Title |
Job title |
|
Department |
Department |
|
Manager |
Manager |
|
Employee ID |
Worker ID |
📒Note: These are the default mappings. Contact our support team to customize or add additional fields as required.
4. Set up Deel
After enabling Deel, perform the following actions to establish a connection:
Navigate to Settings > Integrations in Engagedly.
- Click Deel.
2. Click + Add Connection at the top right, enter a name, and click Save.
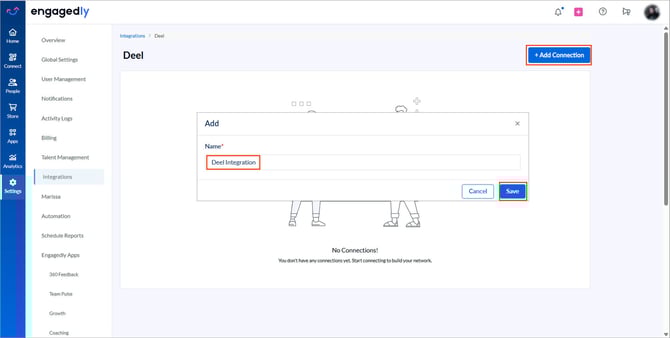
If no connection exists, an empty state appears.
5. Authentication
After creating a connection, you are redirected to the Deel login page.
- Enter your email address and password.
- Click Log in to authenticate your account.

After successful authentication, you are redirected to the authorization page, where you can access Deel data (both organization and employee data).
3. Click Allow to grant Engagedly access to the organization and employee data in Deel.

Once authorization is complete, the connection between Engagedly and Deel is established.
6. Sync employee accounts
Contact our support team to schedule user data syncs to keep employee accounts up-to-date in Engagedly. Syncs can run once daily, twice daily, or at a frequency you specify.
During each sync, Engagedly automatically:
- Adds new employees
- Updates existing employee records
- Blocks or dismisses employees as required
- Updates departments, job titles, and other mapping attributes
You may also request our support team to stop syncing at any time.
📒Note: Blocked employees in Deel appear as blocked in Engagedly.
7. Sync process
By default, Engagedly syncs employees from Gusto every 24 hours at 6:30 AM UTC.
Contact our support team to change the sync time.
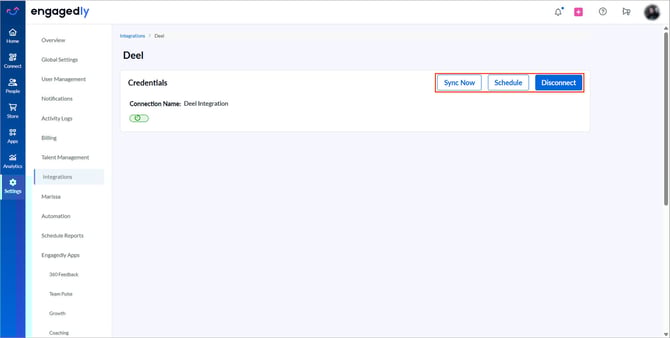
7.1. Sync manually
After adding users in Deel, sync them to import new employees immediately.
- Click Sync Now at the top right.
7.2. Schedule sync
Schedule sync by customizing the time frame if there are any updates to employee data.
-
Click Schedule at the top right.
8. Sync status and reports
After the sync completion, you receive an email notification regarding the sync status and the report, including the number of employees created and updated, and any errors encountered.
9. Disable connection
You can disable the Deel integration with Engagedly at any time.
- Click Disconnect at the top right and then click Confirm.