After respondents submit their responses, admins and authors can view and export survey reports to analyze the collected data and gain insights from survey results.
📒Notes:
-
A minimum of four responses is required to generate analytics. Admins can increase the anonymity threshold above four, but cannot set it below four.
- For Engagement Surveys, Marissa AI provides AI-generated insights and action plans based on survey responses. For more information, refer to the AI summary section in this document.
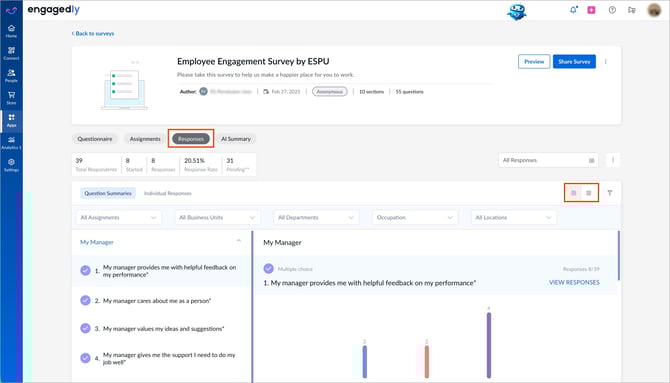
View survey responses
Navigate to Apps > Surveys.
- Scroll down to All Surveys.
- Open the survey for which you want to view responses.
- Do one of the following:
-
- Go to the Assignments tab, click Responses on an assignment to view responses for that specific assignment.
- Go to the Responses tab to view all responses.
-
- Period: On the right, click the Calendar
.png?width=20&height=20&name=CALENDAR%20(1).png) icon to select a date range.
icon to select a date range. - Assignment: On the right, click the Filter
 icon and select the required assignment from the All Assignments drop-down.
 - Team responses: On the left, select a team from the All Users drop-down (applicable only for managers).
- Response view: Select how you want to view the responses:
- Question-wise Responses: Displays response statistics for each question.
- Individual Responses: Displays responses submitted by each respondent.
- Period: On the right, click the Calendar
ℹ️Additional information:
If admins allow managers to access their team’s responses, managers can view the “Questionnaire”, “Assignments”, and “Responses” tabs.
- Questionnaire: Displays survey questions in a read-only format.
- Assignments: Displays active assignments of the survey and their respective respondents. Managers can use a drop-down to select their team.
- Responses: Provides access to both individual and aggregated responses. Managers can use a drop-down to select their team.
📒Notes:
- Question-wise responses provide insights at the question level, helping you analyze response trends and statistics.
- Individual responses display each respondent’s answers, but the respondents’ names are not visible.
Export reports
You can export survey reports in Excel or PDF format. You can also receive reports by email.
Export reports from either the grid view or list view.
Grid view
- On the right, click the Grid View
 icon and then click the Overflow
  Menu.
Menu. - Select one of the following options:
- Individual Report Export: Exports individual respondents’ reports with their information in Excel format.
- Aggregated Report Export: Exports question-wise responses in Excel format.
-
Aggregated PDF Report: Exports question-wise responses in PDF format. The report includes the applied filters.
List view
- On the right, click the List View
 icon and then click the Overflow Menu.
 - Select one of the following options:
- Manage Columns: Customize the columns displayed in the grid.
- Export: Export the grid report after customizing the columns.
- Individual Report Export: Export individual respondents’ reports with their information in Excel format.
- Aggregated Report Export: Export question-wise responses in Excel format.
-
Aggregated PDF Report: Export question-wise responses in PDF format.
ℹ️Additional information:
- Customizing columns using “Manage Columns” does not affect individual or aggregated reports.
- Aggregated reports do not include respondent information.
- If the general survey is anonymous, exporting the individual report displays a pop-up where you can choose whether to include respondents’ demographic data in the report.
- If the general survey is non-anonymous:
- In the individual report, external respondents’ email IDs are visible only for the “Invite through Email” assignment type.
- For the “Generate a public URL” assignment type, respondent information is not captured.
AI summary
The “AI Summary” tab is available for admins and managers only in the engagement survey. Admins can view the AI-generated summary of all survey responses across the organization. Managers can generate a summary for their direct reports' responses by selecting their team: My Team, My Entire Team, or My Secondary Team.
Navigate to Apps > Surveys.
- Scroll down to All Surveys.
- Open the survey for which you want to view responses.
- Go to the AI Summary tab.
Based on the survey responses, Marissa AI provides insights, including action plans.
4. Click Refresh to regenerate the summary if you are not satisfied with the AI-generated responses. The AI generates a new set of responses.
5. Click the Download ![]() icon at the top right to export the AI summary.
icon at the top right to export the AI summary.