After scheduling a meeting, organizers are redirected to the meeting details page, where they can add discussion points.
Adding discussion points helps set a clear agenda, enhances collaboration, saves time, keeps meetings focused, and ensures productive discussions. All participants can add and view discussion points, ensuring transparency and alignment. They can also add notes and attach images, files, or documents to provide additional context and enhance understanding.
Navigate to Apps > Meetings > My Meetings.
- Select a meeting, open the "Meeting Details" page, and perform one of the following actions as required.
-
- Add discussion points manually or using a template.
- Manage existing discussion points.
- Add and manage notes for each discussion point.
- Add sections to combine the relevant discussion points.
- Add files or documents to the meeting.
Add a discussion point manually
2. Go to the Discussion Points tab and click Add discussion point.
3. Enter the discussion point and click outside the field to save it.
Add discussion points from a template
You can create agenda templates to add discussion points from them or use existing templates. Learn more in Create and manage meeting templates.
2. Click Add agenda from and select Agenda Templates.
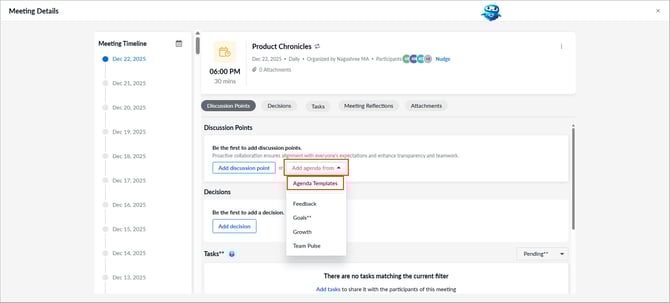
3. At the top right, click the View By drop-down and select an option as required.
-
- Org Templates: Created by your organization’s admin.
- Engagedly Templates: Curated topics recommended by Engagedly
- My Templates: Created by you.
4. Click a template and then click Use Template at the top right.
By default, all discussion points in the template are selected. Deselect any if required.
Manage discussion points
Manage the discussion points that you create.
2. Click a discussion point to edit it.
3. Hover over it and then click the Pin ![]() icon to pin or the Delete
icon to pin or the Delete ![]() icon to remove.
icon to remove.
4. Drag the Six-dot ![]() icon to reorder discussion points.
icon to reorder discussion points.
5. Select a discussion point to mark it as complete. A completed discussion point appears with a strike-through.
6. Deselect it to mark as pending.
Add attachments
2. Scroll to the bottom of the page.
3. Click Attach, select a file, and click Open.
ℹ️Additional information:
- You can pin discussion points only in recurring meetings and unpin them only in upcoming ones.
To unpin a discussion point, click the Pin icon again.
 - Pinned discussion points carry forward to subsequent recurring meetings along with their notes, and you can export them. Learn more in Export notes.
- Discussion points not marked as complete remain visible in the next recurring meetings. Participants can also view previously unchecked discussion points in a non-recurring meeting with the same participants.
Learn more in Add previously unchecked discussion points. - You can also add discussion points from other modules. Learn more in Add discussion points from other modules.
- After adding a discussion point, you can add sections to organize topics and keep discussions structured. Learn more in Add and manage section to a discussion point.
- You can add notes in a discussion point to enhance clarity and collaboration. Learn more in Add and manage notes within a discussion point.