After creating a course, add sections and units to structure the content. If an instructor training unit is added, you must add sessions to it and manage them if required. Sessions define when and how the training is delivered, help assign instructors, manage attendees, share location or meeting details, and track participation effectively.
Add a session
You can add sessions only to courses that you authored.
Navigate to Apps > Learning > Author.
- Go to the Authored by you tab.
- Open a course and click Edit on the right.
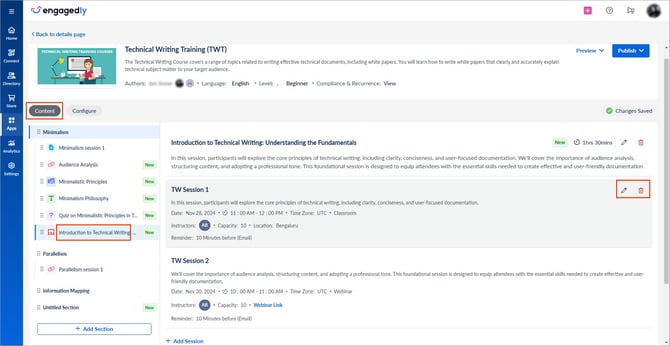
- In the “Content” tab, add an instructor training unit or select an existing training unit from the left panel.
- Click + Add Session on the right.

5. Enter the session title, and set the date and time.
6. Select the time zone from the drop-down and click Save.
If required, you can also:
- Select a session type.
- Enter the location.
- Set the maximum number of attendees.
- Select instructors.
- Add session details.
- Set a reminder for attendees.
📒Notes:
- Leave the “Capacity” field blank to allow unlimited attendees.
- You can select any employee as an instructor based on their expertise.
Manage a session
After adding sessions, edit or delete them if required.
On the right side of a session, select the Pen ![]() icon to edit or the Delete
icon to edit or the Delete ![]() icon to remove as required.
icon to remove as required.
ℹ️Additional information:
- You must add at least one session to an instructor training unit before publishing the course.
- After creating the course, publish it and push it to the library to assign it to learners. Learn more in the Publish course.
- You can view and update attendee statuses. Learn more in Add and manage attendees in a training.
- Changes are auto-saved within the course. Publish the course to make updates available to learners.