Overview of user management
User management is efficiently and securely managing user-related activities within the system. Admins can access user management, which involves creating, configuring, and managing user accounts, defining roles and permissions, organizing users into departments or business units, assigning job titles, specifying employee types, and managing user access to various resources. User management ensures access control, streamlines administrative tasks, and maintains a secure and organized system.
You can access the following features in user management:
Navigate to Settings > User Management.1. Users (Employees)
You can add and manage the user accounts, track their activities, and view the number of active and blocked users.
You can add and manage the users of your organization.
- Select Users, click ADD at the top right, and select the option as required.
- Click NEW USER to manually add users, IMPORT USERS to import users in bulk, or View Integrations to sync users from HRIS platforms, and click CONTINUE.
Notes:
- Always download the latest Excel template before importing employees to ensure compatibility with the current system format.
- When importing or syncing users from an HRIS platform, ensure that the single-select and multi-select custom field types match with the mapped custom field options in Engagedly.
-
If an employee's hire date or birthdate is February 29, our system automatically considers it as February 28 in non-leap years. Any 30-day, 60-day, or work anniversary reviews based on the hire date are also conducted on February 28 during non-leap years.

After adding users, all active employee fields you have added to the sections are available in the AG grid.
In the employee's profile, you can provide multiple custom fields. However, if you add the custom field type as a document, the employee documents are available on their manage profile page, resource center, and talent profile.
You can update the employees' field data when updating their profile information.
All active employee fields are available in the sample template, allowing you to enter employees’ information when importing them.
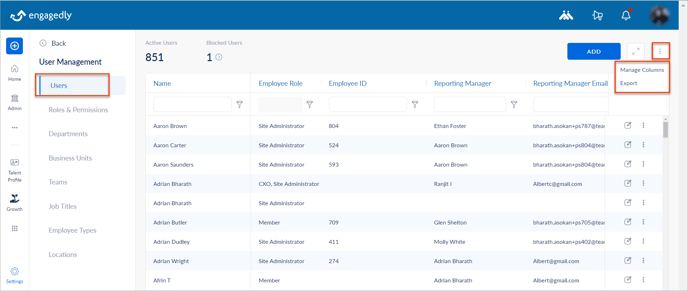
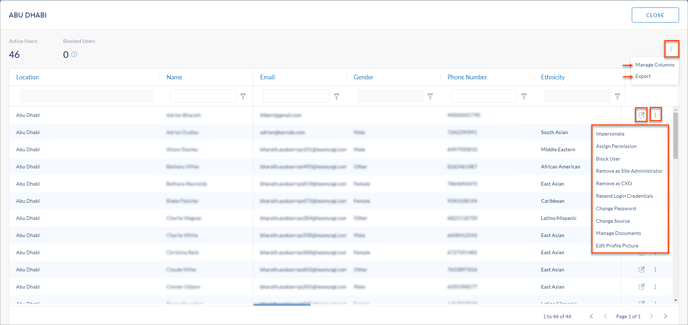
Click the Overflow ![]() Menu at the top right and select the option as required.
Menu at the top right and select the option as required.
- Manage Columns: All active employee fields are available in Manage Columns. However, only the selected fields in the Manage Columns are visible in the AG grid. You can manage the columns as required.
- Export: You can export the employees' information. Only the selected fields in Manage Columns are exported.
In each employee field,
- Click the Edit
 Icon to upadate their information.
 - Click the Overflow
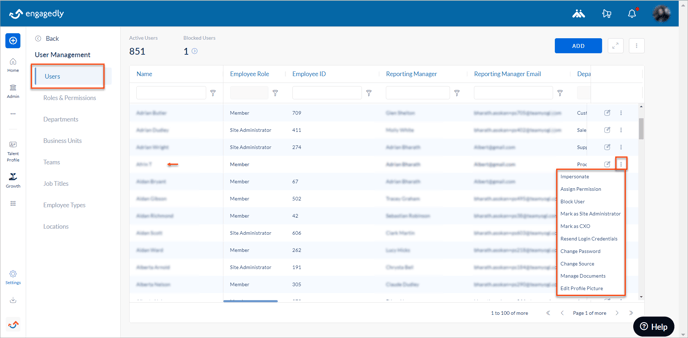
 Menu for additional actions, such as
- Impersonate: You can impersonate any employee within the organization for testing roles, permissions, functionality, or data access, ensuring compliance within the system without affecting real employee accounts.
- Assign Permission: You can assign any permission to anyone in the organization. Learn more in Roles and permissions.
- Block User: You can block and activate the employees.
- Mark as Site Administrator: You can mark anyone in the organization as a site administrator, effectively delegating administrative responsibilities while maintaining security and control.
- Mark as CXO: You can mark anyone in the organization as a CXO, effectively delegating appropriate levels of authority.
- Resend Login Credentials: You can resend login credentials if the employees forget them.
- Change Password: You can change the password for any employee within the organization.
- Change Source: You can update the employee information synced from an HRIS platform such as BambooHR, ADP, or Namely by changing the employee’s source. You can also click the Edit
 Icon for any employee to update their information.
Note: After changing the employee’s source on Engagedly, their information will not sync from the HRIS platform if the user sync process is initiated. However, if the employee's source is changed back to their HRIS platform, the changes made are erased following the sync.
-
- Manage Documents: You can upload the employee documents and notify their manager while uploading.
- Edit Profile Picture: You can edit the employee's profile picture.
Block and activate employees
You can block employees at any time if required, but you must provide a reason for doing so. Blocked employees cannot access the site and do not get notifications about the system's activities.
You can activate the blocked employees.
Navigate to Settings > User Management > Users > Blocked Users.
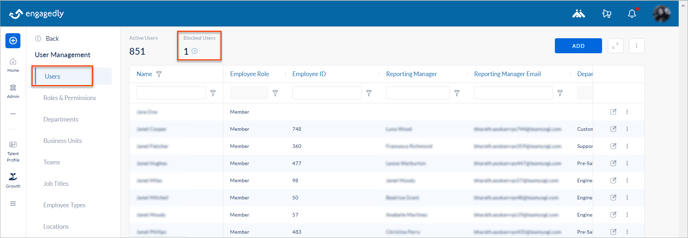
On each employee field, click the Overflow ![]() Menu at the top right, and select Activate the User.
Menu at the top right, and select Activate the User.
Note: Blocking the user removes all reporting relationships. When activating them, you must provide the reporting information again for them to appear in their manager's team.
2. Roles and permissions
Engagedly offers various roles and permissions across all modules. You can assign any role to any employee within the organization, controlling their permissions and data access. You can add new roles, assign them to employees, grant permissions, and manage existing roles as needed.
Add a new role
- Select Roles and Permissions, click NEW ROLE, and type the name and description.
- Select the permissions you want to assign to the new role and click ADD.
Once the role is created, you can assign it to employees. Each role has different capabilities.
Assign role to employees
You can assign both new and existing roles to employees, granting them permissions
based on their role-specific capabilities.
- On the left, select the role you want to assign.
- On the right, click + Assign role and search for employees.
- Press enter on your keyboard to select an employee, and click SAVE.
Manage a role
You can edit or delete the assigned role.
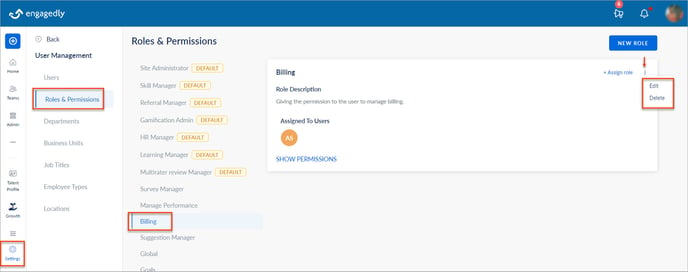
- On the left, select the role you want to edit or delete.
- On the right, click the Overflow
 Menu and select Edit or Delete as required.
You can remove permissions assigned to employees.
1. Click the user initials in the Assigned To Users field.
2. Click the Delete ![]() Icon and click SAVE.
Icon and click SAVE.
For detailed documentation on each role and its user capabilities, contact our support team.
3. Departments
You can group the individuals based on their operational areas within the organization. You can organize the users into departments, facilitating better collaboration and resource allocation within the organization.
You can add and manage the departments of your organization.
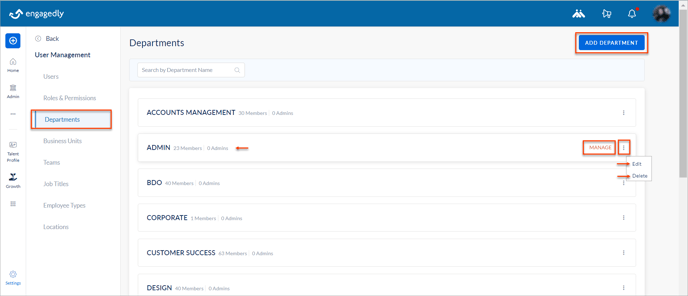
- Select Departments and click ADD DEPARTMENT at the top right.
- Click the Overflow
 Menu on each department field, and select Edit or Delete as required.
 - Hover over any department and click MANAGE, redirecting you to the respective department page for additional actions.
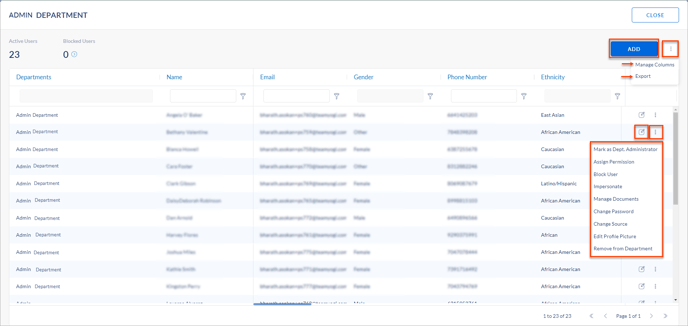
- On each department page,
- Click ADD to add employees to the department.
- Click the Overflow
 Menu at the top right and select Manage Columns and Export as required.
 - Click the Edit
 Icon to edit the employee profile details.
 - Click the Overflow
 Menu on each employee field for additional actions.
4. Business units
You can organize the users based on their business units, which helps to assign tasks and manage workflows.
You can add and manage the business units of your organization.
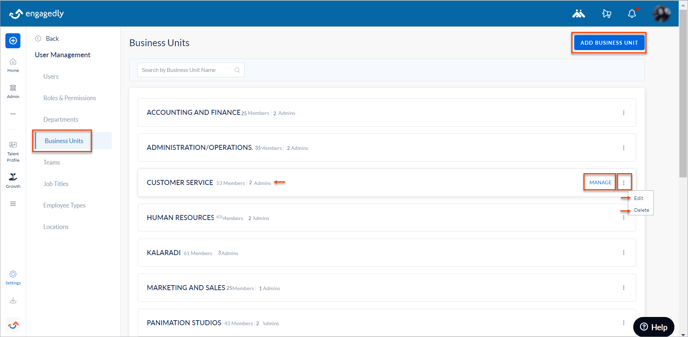
- Select Business Units and click ADD BUSINESS UNIT at the top right.
- Click the Overflow
 Menu on each business unit field, and select Edit or Delete as required.
 - Hover over any business unit and click MANAGE, redirecting you to the respective business unit page for additional actions.
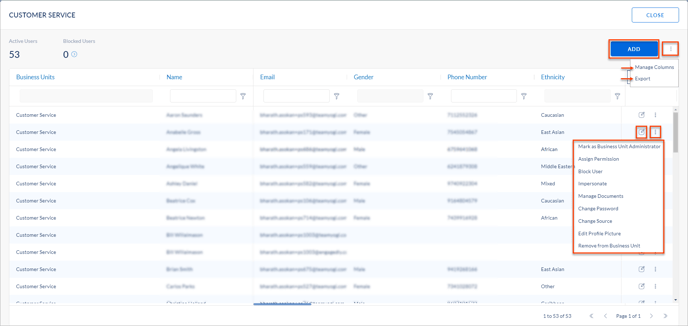
- On each business unit page,
- Click ADD to add employees to the business unit.
- Click the Overflow
 Menu at the top right and select Manage Columns and Export as required.
 - Click the Edit
 Icon to edit the employee profile details.
 - Click the Overflow
 Menu on each employee field for additional actions.
5. Job titles
You can assign job titles to users, providing clarity of their roles and responsibilities.
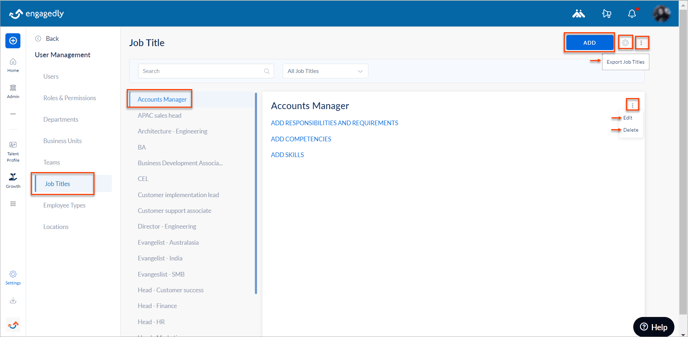
You can add and manage the job titles of your organization.
- Select Job Titles and click ADD at the top right.
- Click the Settings
 Icon at the top right to enable or disable the job title settings.
- Add different competencies to various job titles.
- Set targets for the competencies.
- Click the Overflow
 Menu at the top right and select Export Job Titles.
You can add responsibilities, requirements, competencies, and skills for each job title.
- Click the job title on the left pane, click the Overflow
 Menu in the job title field, and select Edit or Delete as required.
6. Employee types
You can categorize users based on their employment status.
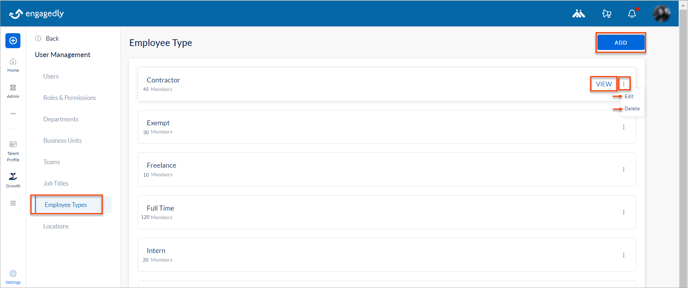
You can add and manage the employee type of your organization.
- Select Employee Types and click ADD at the top right.
- Click the Overflow
 Menu on each employee type field, and select Edit or Delete as required.
 - Hover over any employee type and click VIEW the employees in it, redirecting you to the respective employee type page for additional actions.
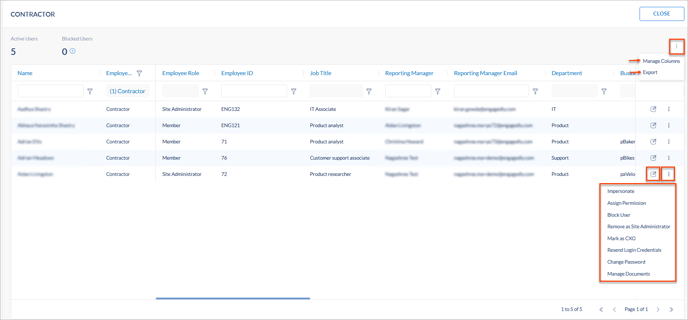
- On the employee type page,
- Click the Overflow
 Menu at the top right and select Manage Columns and Export as required.
 - Click the Edit
 Icon to edit the employee profile details.
 - Click the Overflow
 Menu on each employee field for additional actions.
- Click the Overflow
7. Locations
Locations refer to the geographical sites where users may be located, such as offices, branches, or remote work locations.
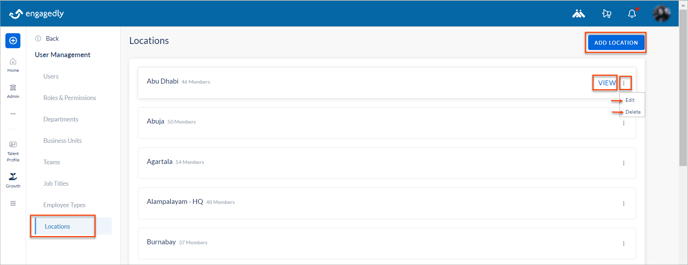
You can add and manage the locations of the employees within the organization.
- Select Locations and click ADD LOCATION at the top right.
- Click the Overflow
 Menu on each location, and select Edit or Delete as required.
 - Hover over any location and click VIEW the employees in it, redirecting you to the respective location page for additional actions.
- On each location page,
- Click the Overflow
 Menu at the top right and select Manage Columns and Export as required.
 - Click the Edit
 Icon to edit the employee profile details.
 - Click the Overflow
 Menu on each employee field for additional actions.
- Click the Overflow
User management is a fundamental aspect, empowering the admins to control access, maintain security, and streamline administrative processes, ensuring a well-organized and secure environment for all users within the organization.