Employees, Managers, and Admins in the organization can create a Goal.
As an employee, you can create individual Goals and also assign them to other employees in the organization.
Engagedly offers you predefined goal templates curated by industry experts, which are available in the Goals library.
Admins can also create customizable templates based on the organization's requirements.
You can use a template from either the Goals library, ask Marissa AI, or create one that suits your requirements.
Navigate to Home > Goals > My Goals.
Use template
You can use a template to add goals.
- Click Add Goal at the top right.
- Click Suggest Goals, select Use a Template, and click Add.

After adding goals, you can edit them if required and follow the below steps.
Ask Marissa AI
Marissa AI can suggest a goal with key results based on the goal title you provide.
- Click Add Goal at the top right.
- Click Suggest Goals, select Ask Marissa, type the goal title, and click Generate.

3. Click Add at the bottom right.
After adding goals, you can edit them if required and follow the below steps.
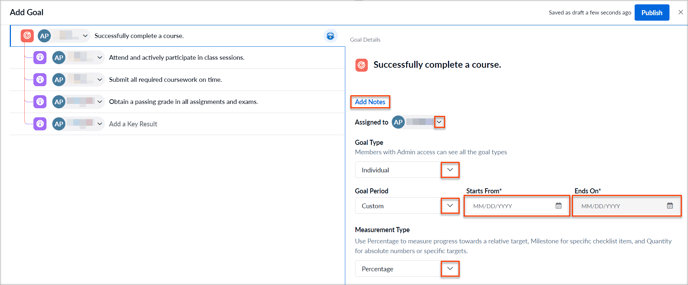
Create goal
You can create goal as per tailored to your organization's needs.
- Click Add Goal at the top right.
2. Type the Goal title in the Start typing your Goal field and Key Results title in the Add a Key Result field.
Note: You can skip adding Key Result if it is not required for the Goal.
3. Click Add Notes to add any notes related to the Goal, if required.
4. In the Assigned to section, click the drop-down, search, and select the employee you want to assign the Goal.
Note: By default, your name is assigned as the Goal owner.
5. In the Goal Type section, click the drop-down and select a Top Level Goal.
Note: Only admins can change the Goal Type to create a Top Level Goal.
6. In the Goal Period section, click the drop-down, select Custom to set the Goal start and end date, or select a predefined Goal period created by admins.
Note: Employees can select custom only if the admin has enabled the feature.
7. In the Measurement Type section, click the drop-down and select types like Percentage, Quantity, or Milestone as required. If you select,
- Percentage: You measure progress from 0% to 100%, and when it is 100%, it is marked as achieved.
- Quantity: You select a unit type and set start and end values to achieve the Goal.
- Milestone: You mark the Goal as completed once it is achieved.
Note: If the parent goal has Percentage as its measurement type, you can add weights to its key results. However, if the parent goal has Quantity or Milestone as its measurement type, the manage weights feature is not available.
 8. In the Categories section, click the drop-down and select the Goal categories.
9. In the Visibility section, click Add to add a specific Department and Business Unit for the Goal if required.
Note: If employees are permitted to manage their goal visibility, their preferences override the admin settings.
10. In the Align to a Parent Goal section, click Select a Parent Goal, and select a Goal to align with the individual Goal. You can align Goals with any individual or Top Level Goals in the organization only if the admin enables the feature.
Note: Aligned goals follow the visibility settings of their parent Goal. For example,
- If the visibility of the parent Goal is set to Everyone, then the aligned Goal will also be visible to all employees in the organization.
- If the parent Goal's visibility is restricted to specific departments or business units, the aligned Goal will only be visible to members of those respective departments or business units.
11. In the Attachments section, click Add Attachment to add any file, if required.
12. In the Notify Assignee section, click the drop-down and select the time interval to send a reminder notification to the Goal owner.
13. In the Discuss with or add a comment section, type @ to mention the employee’s name to discuss the Goal, and click Submit.
14. Select the Key Result, fill the necessary details, and click Publish.

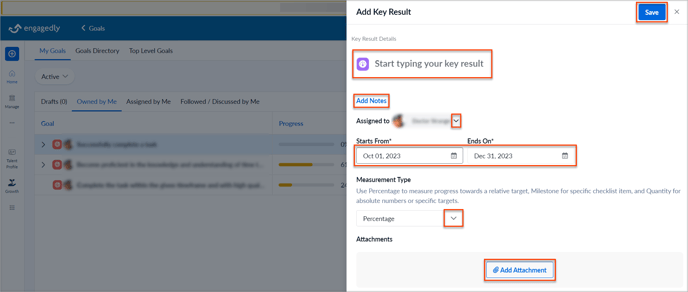
Add Key Results to a Goal
A Key Result measures the progress to keep track of a particular Goal. It provides a clear and measurable target for a Goal. You can assign each Key Result to different employees to promote teamwork.
Note: A Goal can have multiple Key Results, and it can be assigned to other employees in the organization.
Navigate to Home > Goals > My Goals > Owned by Me.
1. Select the Goal and click the Add ![]() Icon.
Icon.

2. Type the Key Result title and click Add Notes to add notes, if required.
3. In the Assigned to section, click the drop-down, search, and select the employee you want to assign the Goal if required. By default, you can view your name as the Key Result owner.
Note: If the visibility is set to a department or business unit, as a Key Result owner from another department or business unit, you can only view your Key Result and the Goal title.
4. Set the Key Result start and end dates.
5. In the Measurement Type section, click the drop-down and select types like Percentage, Quantity, or Milestone as required. If you select,
- Percentage: You measure progress from 0% to 100%, and when it is 100%, it is marked as achieved.
- Quantity: You select a unit type and set start and end values to achieve the Goal.
- Milestone: You mark the Goal as completed once it is achieved.
6. Click Add Attachment to add any file, if required, and click Save.