Integrate AD FS with Engagedly
Table of contents
1. Introduction
Active Directory Federation Services (AD FS) is a Microsoft platform that allows secure single sign-on (SSO) by extending your organization's Active Directory to the cloud. It enables users to access multiple web applications across organizational boundaries using a single sign-on (SSO).
The AD FS and Engagedly integration allows employees to use their AD FS credentials to access Engagedly, providing a seamless and secure single sign-on (SSO) experience. IT teams can efficiently manage user access and permissions, ensuring that only authorized users can access sensitive data. By centralizing identity management, organizations can improve security, reduce administrative overhead, and offer a smoother user experience across platforms.
2. Integration
Admins can seamlessly integrate Active Directory Federation Services (AD FS) with Engagedly, which enhances security and simplifies identity management for organizations.
Prerequisites
- AD FS users should have their first names, last names, and email IDs saved in the AD FS portal.
- Install AD FS on your Microsoft server.
Navigate to Settings > Integrations.
- In the SSO field, click SAML Single Sign On.
- In the SAML SSO window, click ADD at the top right.
- In the ADD SAML SSO pop-up, type the identifier name as required, and click SAVE.

Once saved, the system will generate the ACS URL and Entity ID.
4. In the Windows Server Management, select Tools, open AD FS Management, and select the Relying Party Trusts folder.
5. On the right pane, select Add Relying Party Trust in the Actions field.

6. On the Welcome page, click Start to begin the setup wizard.
7. On the left pane, click Select Data Source, select the Enter data about the relying party manually option, and click Next.

8. On the Specify Display Name window, enter the display name as required and click Next.

Note: You can add notes after entering the display name, which is optional.
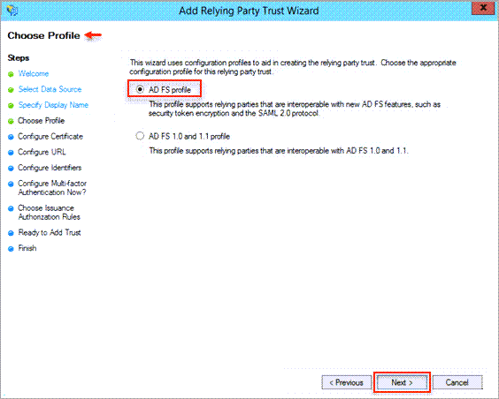
9. On the Choose Profile window, select AD FS profile and click Next.
10. On the Configure Certificate window, click Next.
11. On the Configure URL window, select Enable support for the SAML 2.0 WebSSO protocol.
12. Copy the ACS URL generated in Engagedly (step 3), paste it into the Relying party SAML 2.0 SSO service URL field, and click Next.

13. Copy the Entity ID generated in Engagedly (step 3), paste it into the Relying Party Identifier field, and click Next.
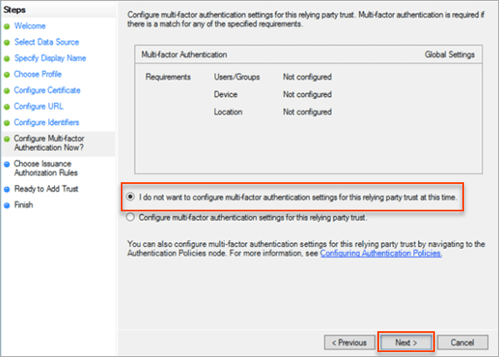
14. Select the option I do not want to configure multi-factor authentication settings for this relying party trust at this time, and click Next.
You can skip configuring multi-factor authentication, as it is not related to the setup.
15. On the Choose Issuance Authorization Rule window, select Permit all users to access this relying party radio button and click Next.
16. Click Close to exit.
The Relying Party Trust is successfully created. Now, you must create the claim rules.
17. Click Add Rule.
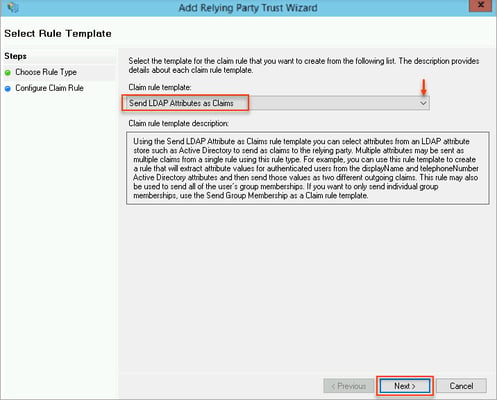
18. In the Claim rule template drop-down, select Send LDAP Attributes as Claims and click Next.
19. Type a name in the Claim rule name field as required.
20. In the Attribute store drop-down, select Active Directory.
21. Select E-Mail-Addresses in the LDAP Attribute and Outgoing Claim Type fields, and click Finish.

22. Click Add Rule to create another rule, which is mandatory.
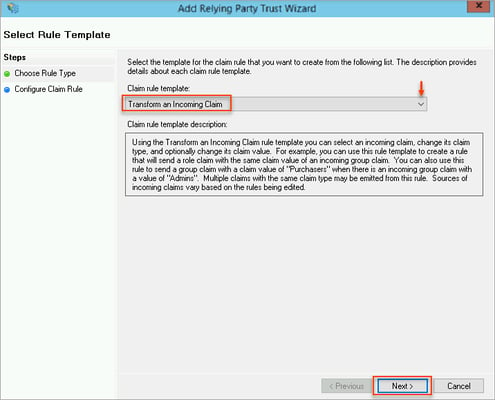
23. In the Select Rule Type window, select Transform an Incoming Claim in the Claim rule template drop-down, and click Next.
24. Type a name in the Claim rule name field as required.
25. In the Incoming claim type field, select E-mail-Address, which must match the Outgoing Claim Type in rule 1 (step 21).
26. Set the values Name ID in the Outgoing claim type and Email Address in the Outgoing name ID format fields.
27. Select Pass through all claim values and click Finish.

You must configure certain settings for Relying Party Trust.
28. Right-click the newly created Relying Party Trust and select Properties.
29. Select the tab Advanced and select SHA-1 in the drop-down.
30. Select the Monitoring tab and copy the ACS URL generated in Engagedly (step 3).
31. On the AD FS Management, paste it into the Relying Party’s Federation Metadata URL field and click Test URL.
You can close the wizard if the configuration settings are correct and it works well.
32. Download the metadata XML file from the metadata URL on AD FS.
Note: You can get the metadata URL on AD FS by following: Select Service/Endpoints > Metadata > Type: Federation Metadata.
33. Open the downloaded XML file and copy the Single Sign On URL.
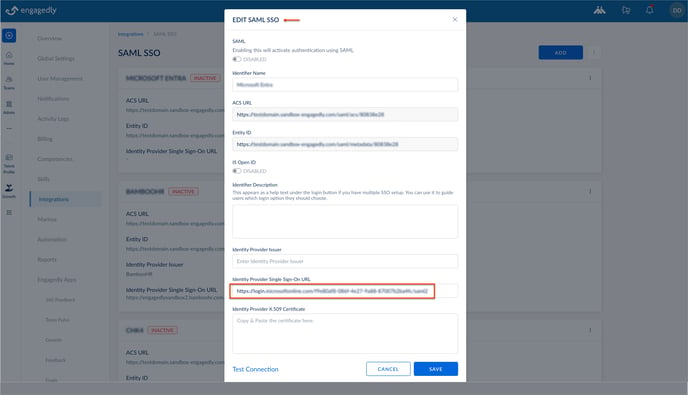
34. On the Engagedly portal, in the EDIT SAML SSO pop-up, paste the Single Sign On URL in the Identity Provider Single Sign On URL field.
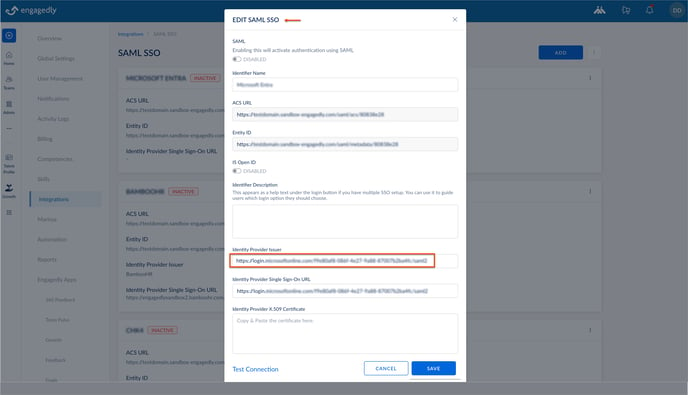
35. Copy the Relying Party Trust Identifier from AD FS. On the Engagedly portal, in the EDIT SAML SSO pop-up, paste it into the Identity Provider Issuer field.
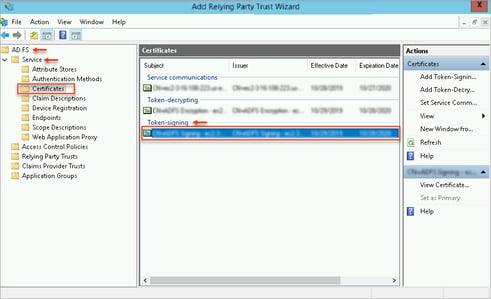
36. In the AD FS Management, select the AD FS folder, select the Service folder, and select the Certificates folder.
37. In the Token-signing field, double-click the certificate.
38. On the Certificate pop-up, open the Details tab, select Copy to File, and click OK.
39. In the Certificate Export Wizard pop-up, click Next.
40. Select the format you want to use Base-64 encoded X.509, and click Next.
41. Click Browse to specify the location where you want to export the certificate and type the name as required.
42. Click Save in the Save pop-up, click Next, and then click Finish in the Certificate Export Wizard pop-up.
43. Open the downloaded certificate in a text editor and copy the entire content, including the lines ----- BEGIN CERTIFICATE-----and----- END CERTIFICATE-----.
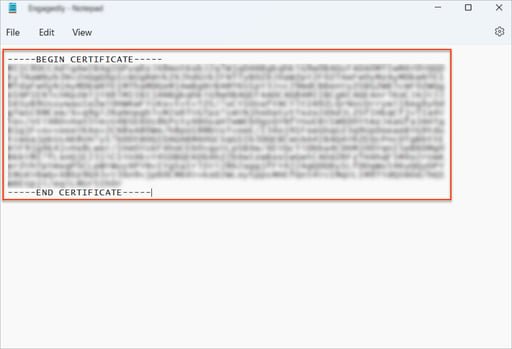
44. On the Engagedly portal, in the EDIT SAML SSO pop-up, paste the certificate content into the Identity Provider X.509 Certificate field and click SAVE.
AD FS is successfully integrated with Engagedly for single sign-on (SSO).
AD FS users now exist on the Engagedly portal with their same email ID to access single sign-on (SSO) on Engagedly.