Integrate Mentoring Complete with Engagedly
Table of contents
- Introduction
- Integration process
2.1. Access Mentoring Complete
2.2. Activate your account
2.3. Complete initial setup - Create a program
- Add participants
- Switch between platforms
1. Introduction
Integrating Mentoring Complete with Engagedly allows organizations to launch and manage structured mentoring programs directly from the Engagedly platform.
This integration enables admins to:
- Access Mentoring Complete from within Engagedly
- Create and manage mentoring programs
- Sync Engagedly users automatically
- Add participants to mentoring cohorts
- Switch seamlessly between both platforms
Mentoring Complete supports Engagedly’s E3 Framework (Engage, Enable, Execute) by enabling structured mentoring programs that promote employee learning and development. Together, the platforms provide a centralized way to manage mentoring initiatives and track participant progress within Engagedly.
2. Integration process
Only admins can set up the integration.
2.1. Access Mentoring Complete
- Log in to Engagedly.
- Click your profile icon at the top right, then select Mentoring Complete.
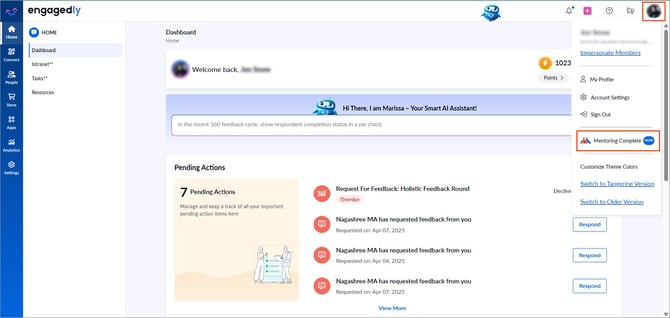
A pop-up appears with the following options:
-
- Start a Free Trial
- Talk to Account Manager
- Learn More
💡Tip: Click Learn More to review key features such as AI-powered mentoring, automated onboarding, mentoring match tools, development goal support, and reporting before starting a free trial or contacting the account manager.
2.2. Activate your account
Option A:
Click Talk to Account Manager to request assistance. This notifies our account manager to contact you.
Option B:
- Click Start a Free Trial.
- Review your organization's information.
- Accept the terms of service and click Submit.
Your trial account is created successfully.
📒Note: The trial period is 90 days.
After creating an account, click Get started to log in to Mentoring Complete.
2.3. Complete initial setup
After logging in:
- Follow the onboarding checklist or skip the tutorial.
- Tutorials are available at any time under “My Account” (at the top right).
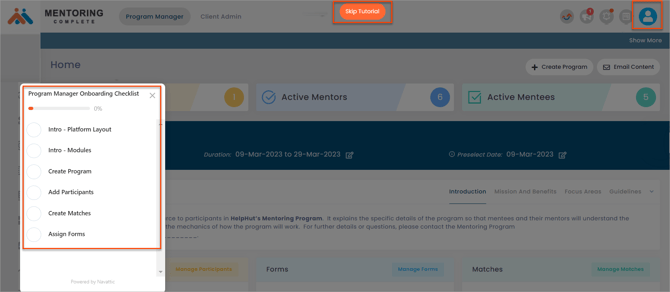
By default, the following roles are created:
- Program Manager
- Client Admin
You land in the “Program Manager” role.
3. Create a program
Create a program to enable mentoring modules. Use the express setup or an advanced setup to create a program.
📒Note: Only the program manager can create a program.
Express setup
The default focus areas are available in the express setup.
- Click Create Using Express Setup.
- Enter program details.
- Click SUBMIT.
Advanced setup
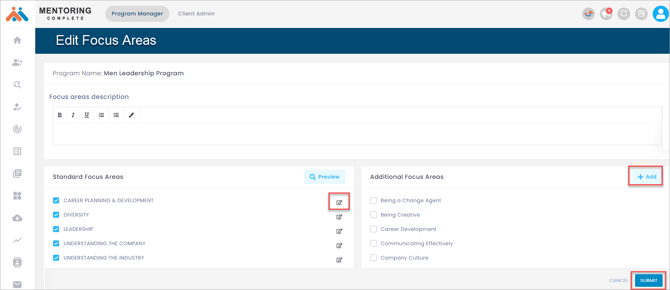
You can customize the focus areas in the advanced setup. Focus areas help match mentors and mentees based on their skills and development goals.
- Click Create Using Advanced Setup.
- Enter program details.
- Edit or add focus areas.
- Click SUBMIT.
- Click the Tick
 icon to edit focus areas.
 - Click the Edit
 icon to edit focus areas or + Add to include additional focus areas.
 - Click SUBMIT.
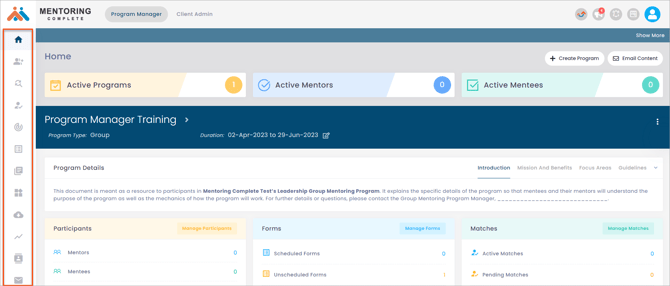
After creating a program, the mentoring modules appear on the left panel.
📒Note: Mentoring Complete includes a matching form that helps pair mentees with mentors. The form uses focus areas to determine compatibility. Program managers can edit the default focus areas or add new ones to ensure participants are matched based on their skills, goals, and requirements.
4. Add participants
After creating a program, add participants to it to initiate mentoring in your organization.
📒Note: Only the program manager can add participants to a program.
- Click the Participants
 icon on the left panel.
 - Click + Add Engagedly Users at the top.

Engagedly employees are automatically synced with Mentoring Complete.
3. Select a role for participants you want to add to the program.
4. Click Submit.
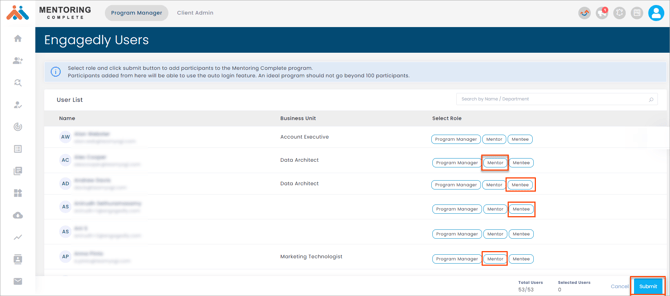
Participants are added to the program successfully.
5. Switch between platforms
After your Mentoring Complete account is created, you can switch between Engagedly and Mentoring Complete at any time.
- In Mentoring Complete, click the Engagedly
 icon at the top right to return to Engagedly.
 - In Engagedly, click your profile picture and select Mentoring Complete to open Mentoring Complete.