Overview of global settings
Global settings are a centralized approach to streamlining administrative tasks, saving the admin time and effort. If the admin makes any changes in the global settings, they will reflect the settings for everyone in the organization. This helps to ease maintenance and improve management, which allows to apply the changes to all users automatically.
You can perform the following actions in the global settings:
Navigate to Settings > Global Settings.
- Password Policy: It empowers you to enforce secure password practices for all users within the organization. You can define password policy and requirements, enhancing the organization’s cybersecurity by reducing the risk of unauthorized access and data breaches.
- Preferences: You can set the time zone and language as required.
Note: Global preferences apply to everyone in the organization, except for those who have already customized their preferences.
- Employee Fields: By default, certain sections, such as personal, contact information, work, diversity, and inclusion, are available in the employee fields.
Click the Down Arrow ![]() Icon to expand the section.
Icon to expand the section.
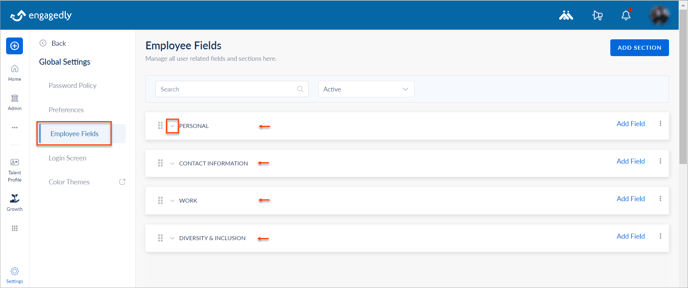
Each section consists of various default fields. You can also add and manage the sections and fields, which help to update and manage all employee information.
All active employee fields appear in the employee profile.
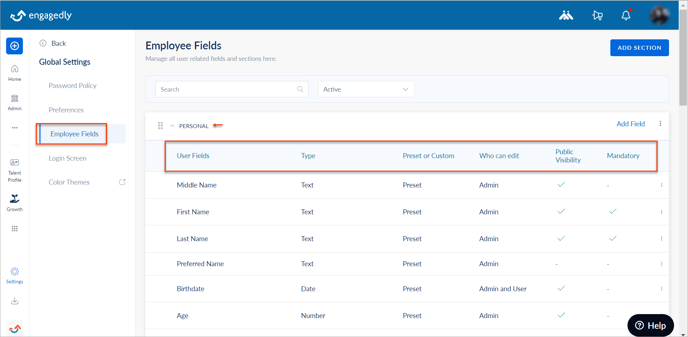
Each section has the following information:
- User fields: Preset or custom field in the employee profile.
- Type: Field type.
- Preset or custom: Indicates whether the field is a default or custom field.
- Who can edit: Indicates whether the admins or both admins and employees can edit the employee profile information.
Note: If you select the option Admins only, the employees cannot edit the particular field in their profile.
- Public visibility: It indicates whether anyone in the organization can view a particular field in the employee profile information.
- Mandatory: It indicates the admin must fill the employee information in the mandatory field during user creation.
You can add employees to the Engagedly platform in different ways:
-
- Manually by adding employees.
- Importing employees in bulk.
- Syncing employees from other HRIS platforms.
Note: You cannot add, import, or sync employees if the mandatory field is left blank.
- Login Screen: Customize the appearance of the login page for all users. Apply the organization’s branding elements, such as name, logo, and description about the organization, to create a consistent look.
- Color Themes: Customize the visual styles of the organization's branding colors to define the overall look and feel of the user interface.
Add sections and fields
You can add multiple sections to the employee fields and multiple fields to a section as required. The fields you add to the sections are called custom fields, and they are available in the employee profile.
Navigate to Settings > Global Settings > Employee Fields.
- Click ADD SECTION at the top right.
- Type the title and click SAVE & NEXT to add fields to a section.
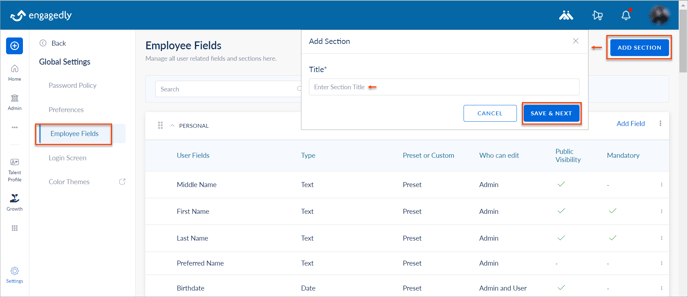
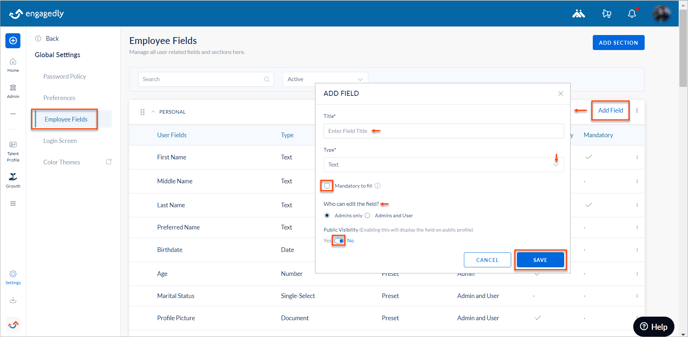
3. Click the Add Field at the top of a section and type the field title.
Note: You cannot add the same title for the section and the field.
4. Click the drop-down in the Type field and select the option as required.
Note: After adding the title and type of the field, you cannot edit them.
5. Enable Mandatory to fill if required, indicating that the employees must fill this field.
6. Select who can edit the field.
Note: If you select the option Admins only, the employees cannot edit the particular field in their profile.
7. Toggle the button to set the Public Visibility and click SAVE.
You can add the following types of custom fields:
-
- Text
- Number
- Date
- Single-select
- Multiple-select
- Boolean (Yes or No)
- Document
While adding the field, you can add, edit, or delete the options for single or multi-select fields. However, you cannot edit the field type after adding it.
All active custom field types are available in the employee profile. However, the document type is available on the employee’s manage profile page, resource center, and talent profile.
Manage sections and fields
You can edit the section if required.
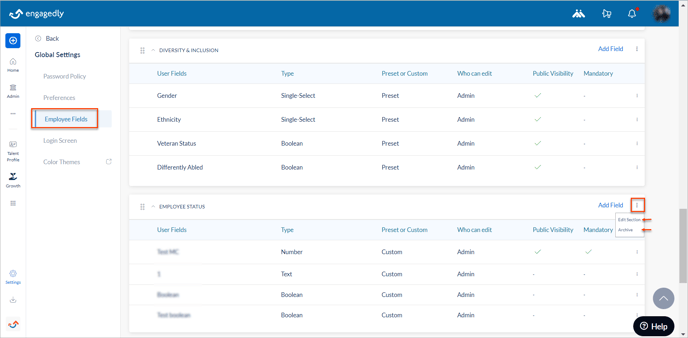
At the top right of each section, click the Overflow ![]() Menu and perform the following:
Menu and perform the following:
- Select Edit Section to edit the title of a section.
- Select Archive to hide a section that you create.
Note:
- Archiving a section automatically archives all fields within that section.
- You cannot archive the default sections to avoid losing critical information.
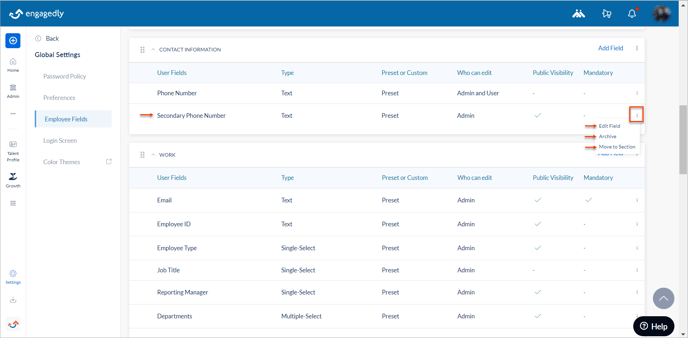
You can manage the fields in a section if required. You can archive all the custom fields. However, while you can archive some preset fields, you cannot archive others.
At the top right of each field, click the Overflow ![]() Menu and select
Menu and select
- Edit Field to edit the field settings.
- Archive to hide the field in the profile.
- Move to Section to move this field to another section.
Note:
- After adding the title and type of the field, you cannot edit them.
- You cannot archive certain mandatory preset fields in the employee profile to avoid losing critical information.
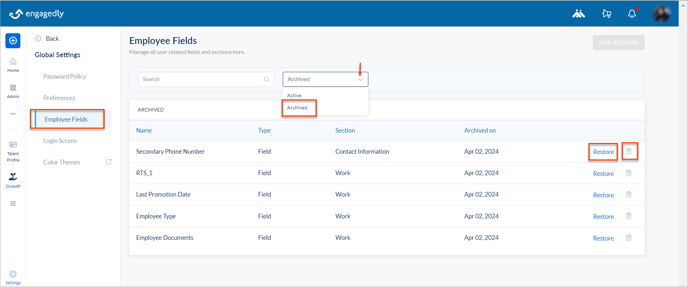
After archiving the sections and fields, you can restore and delete them if required.
Click the drop-down at the top of the Employee Fields page, select Archived, and click the Restore or Delete ![]() Icon for a section or field as required.
Icon for a section or field as required.
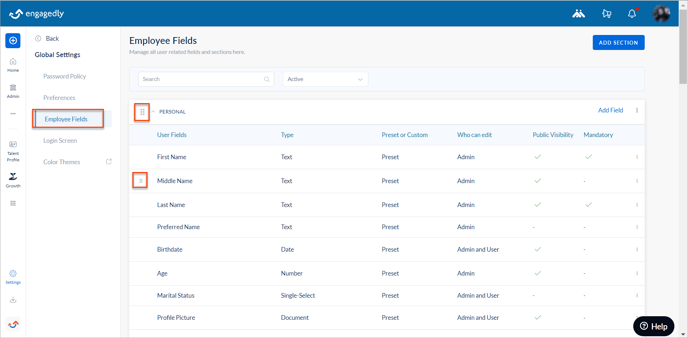
You can rearrange the sections and fields within the sections as required.
- For sections, the Six Dot
 Icon is available on the left side.
 - For fields, hover over to view the Six Dot
 Icon on their left.
Drag the Six Dot ![]() Icon and rearrange it as required.
Icon and rearrange it as required.
Global settings are powerful tools that help admins maintain consistency, security, and efficiency in management across the organization. It contributes to a cohesive and secure digital environment while streamlining administrative tasks and ensuring compliance with organizational policies.