Add and manage automation workflow
Admins can use automation to trigger workflows within the organization, initiating a series of automated actions based on specific conditions they set. This reduces manual effort and ensures consistent and efficient task execution.
It is highly beneficial in various ways:
- It helps admins organize and manage complex processes.
- It saves time by automating tasks.
- It ensures the tasks are performed consistently, with improved accuracy.
- It increases productivity by automating repetitive tasks.
You can automate the following workflows for your organization’s employees:
- Send email notifications
- Assign courses
- Assign learning paths
- Assign surveys
- Assign goals
- Award discretionary badges
After adding, you can manage workflows if required.
You can assign the manage workflows permission to any employee of the organization, allowing them to manage all workflows and view a list of surveys, discretionary badges, courses, and learning paths created in the organization.
Note: Users with this permission alone cannot create or edit surveys, discretionary badges, courses, or learning paths. They must have the appropriate module permissions to perform these actions.
Navigate to Settings > Automation.
- Click Add Workflow at the top right and type the workflow title.
- Select a trigger point to trigger the automation.
The following trigger types are available:
- If you select Time Based, set the period and frequency. You can set frequencies to daily, weekly, monthly, quarterly, or annually.
- If you select the User actions, select a trigger point Added, Updated, or both.
Note: If you select the trigger point as Updated, ensure that you update the users' profiles, allowing the workflow to run according to the set conditions.
Click + Add Condition to add multiple conditions as required.
You can select multiple conditions, including default and custom employee fields, such as job title, reporting manager, date of hire, departments, and business units as required.
Note: After adding a workflow, if certain employee fields associated with a workflow condition are deleted or archived, you will receive an error message when manually running the workflow and adding or updating the users' profiles, directing you to check the configurations of the employee fields.
4. Toggle the button to All or Any to automate the workflow when these conditions are satisfied.
When you select
- All: The trigger should satisfy all the specified conditions.
- Any: The trigger should satisfy any of those conditions.
5. In the Actions field, click the drop-down and select the action to perform when the conditions are satisfied.
For example, let us select the action Send email notification to automate email notifications within the organization.

6. In the User(s) field, search and select employees from your organization.
You can also select from the following options:
- Trigger Subject: Automatically send the email notification to the user being added or updated based on the trigger point.
- Manager, HR Managers, and Secondary Managers: Notify these roles about email notifications related to their employees (trigger subject).
When you search and select a user from the User(s) field drop-down, you can view the following options: Trigger Subject, Manager, HR Managers, and Secondary Managers.
7. In the Email ID(s) field, enter the external users' email IDs (optional). You can add multiple email IDs separated by commas.
8. Type the email subject and message.
9. In the Schedule field, toggle the button to Yes to schedule email notifications for a specified date and set the period (optional).

Click + Add Action to add multiple actions as required. Each action triggers a separate email notification based on the conditions you set.
10. Click Save at the top right.
The workflow automatically sends email notifications to employees based on the configured trigger points, conditions, and actions.
Manage workflow
After adding a workflow, you can manage it by performing the following actions:
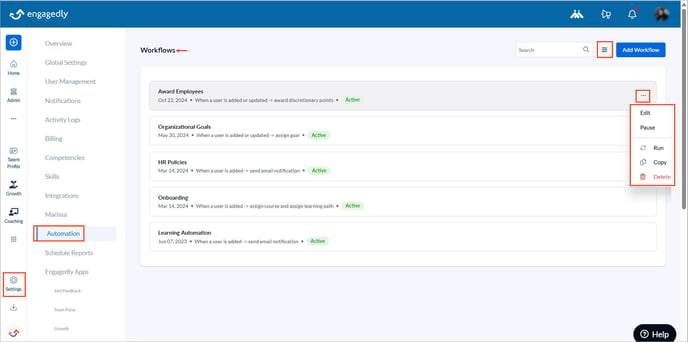
Navigate to Settings > Automation.
- On the Workflows page, click the Filter
 Icon to sort workflows by active or paused status.
 - Hover over the workflow, click the Overflow
 Menu, and select one of the following options:
- Edit: Modify the workflow settings.
- Pause: Halt a workflow and resume it at any time.
- Run: Manually trigger a workflow that does not automate.
- Copy: Duplicate a workflow with the same settings. You can edit it as required.
- Delete: Remove a workflow permanently.

Note: The paused workflows do not trigger until you resume them.
Automation workflows are valuable tools for admins to optimize their administrative processes effectively.