Automate surveys
Admins can use automation to trigger workflows within the organization, initiating a series of automated actions based on specific conditions they set. Learn more in Add and manage automation workflow.
Automating surveys helps admins by saving time, streamlining data collection, improving response rates, and providing real-time insights for faster decision-making.
You can add workflows for conducting surveys within the organization.
You can assign manage workflows permission to any employee of the organization, allowing them to manage all workflows and view a list of surveys created in the organization.
Note: Users with this permission alone cannot create or edit surveys. They must have the appropriate module permissions to perform these actions.
Learn more in the Overview of user management to assign roles and permissions.
Contact our support team for documentation to understand each role with the user capabilities.
Navigate to Settings > Automation.
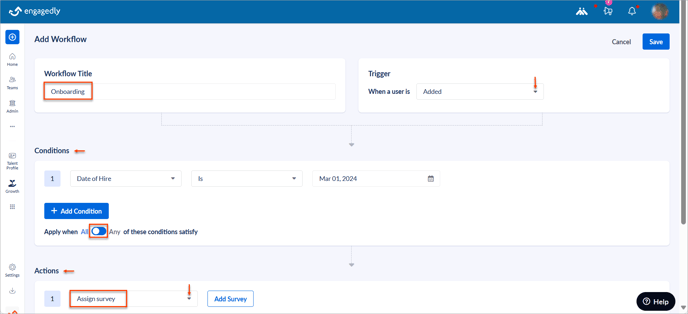
- Click Add Workflow and type the workflow title.
- Select a trigger point to trigger the automation.
The following trigger types are available:
- If you select Time Based, set the period and frequency. You can set frequencies to daily, weekly, monthly, quarterly, or annually.
- If you select the User actions, select a trigger point Added, Updated, or both.
Note: If you select the trigger point as Updated, ensure that you update the user profiles, allowing the workflow to run according to the set conditions.
Click + Add Condition to add multiple conditions as required.
You can select multiple conditions, including default and custom employee fields, such as job title, reporting manager, date of hire, departments, and business units as required.
4. Toggle the button to All or Any to automate the workflow when these conditions are satisfied.
When you select
- All: The trigger should satisfy all the specified conditions.
- Any: The trigger should satisfy any of those conditions.
5. In the Actions field, click the drop-down and select Assign survey.

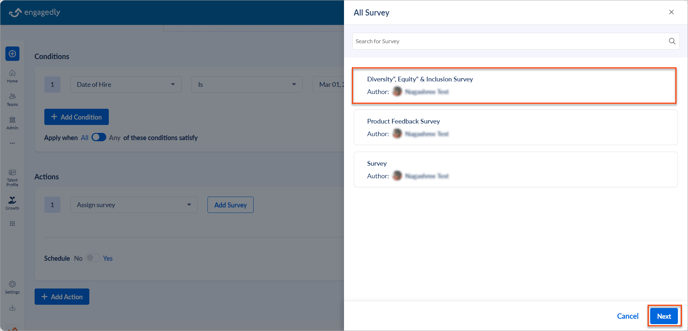
6. Select the survey you want to assign and click Next.
You can view all the surveys you created, or co-authored. You can add multiple surveys if required.
Note: You cannot view the surveys created by others.

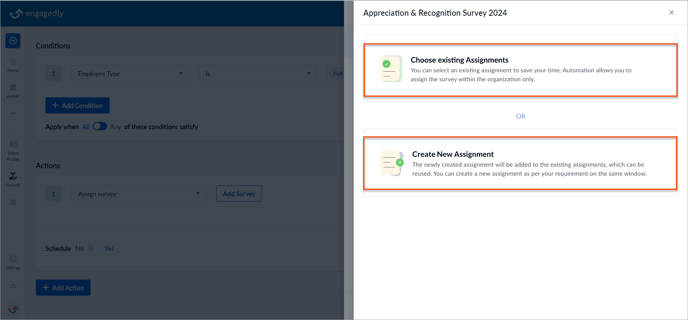
7. Click Choose existing Assignments, select the assignment, and click Assign.
Note: You can view the surveys created by you and the assignments created by co-authors. Only the assignments that you share within the organization are available here. If the assignment is closed, you can open and assign it.
Or
Click Create New Assignment, type the title, modify the email message if required, set the start and end dates, and click Create.

Click + Add Action to add multiple actions as required.
8. In the Schedule field, toggle the button to Yes to assign surveys after the specified period of the trigger point, which is optional, and set the period.
9. Click Save at the top right.
The surveys get automatically assigned to the employees based on the specified trigger points, conditions, and actions that you have set.
After adding the workflows, you can view them in Workflows. You can edit, pause, run, and delete them as required. Learn more in Add and manage automation workflow.