Table of contents
- Introduction
- Pre-integration setup
2.1. Add content to H5P
2.2. Add users to H5P - Integration process
3.1. Add LTI connector to Engagedly
3.2. Import H5P content to Engagedly - Manage connector
- Glossary
1. Introduction
Integrate H5P with Engagedly’s Learning module (LXP) using the LTI (Learning Tools Interoperability) connector. This integration allows you to embed interactive H5P content directly into Engagedly courses, making learning more engaging and effective.
H5P (HTML5 Package) is an open-source platform that enables you to create, share, and reuse interactive content such as quizzes, videos, presentations, and assessments.
LTI is a standard developed by the IMS Global Learning Consortium that connects learning platforms like Engagedly with external tools like H5P. It acts as a secure bridge, enabling seamless data exchange without requiring separate logins.
📒Note: This document covers the integration setup for both Tangerine (V2) and Indigo (V3). Screenshots are captured from Indigo (V3), so the user interface may vary slightly in Tangerine.
Prerequisites
- Admin access to both H5P and Engagedly.
- LTI connector added in Engagedly.
📒Note: Engagedly currently supports LTI version 1.1 only.
2. Pre-integration setup
Before integrating H5P with Engagedly, add content and users to H5P.
2.1. Add content to H5P
Adding content to H5P is required to import it into Engagedly’s LXP.
- Log in to H5P.
- On the "Manage Content" page, click Add Content at the top.
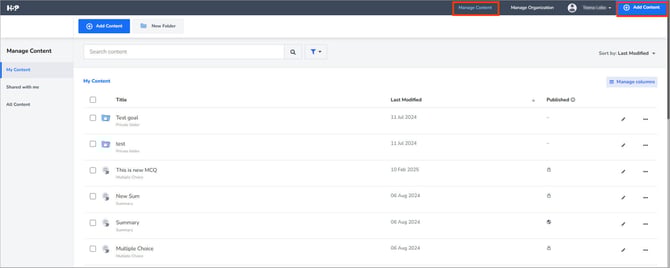
3. Select the content type.
4. Enter the title, description, and required details.
5. Click Save at the top right.
2.2. Add users to H5P
After adding content, add users to H5P.
- Log in to H5P.
- Select Manage Organization at the top.
- Select Users in the left panel.
- Click Add User at the top.
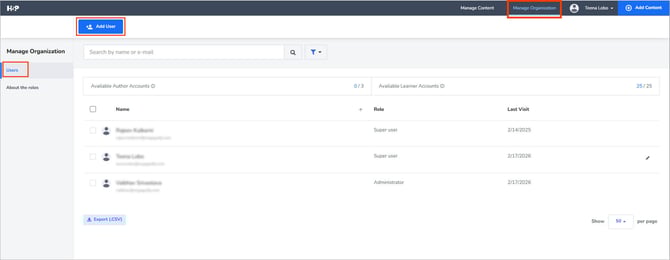
5. Enter the first and last names.
6. Enter their email address.
7. (Optional) Upload a profile picture.
8. Select a role and click Add user.
3. Integration process
Before importing H5P content into Engagedly, add the LTI connector, which acts as a bridge and ensures seamless data exchange.
3.1. Add LTI connector to Engagedly
Configure the LTI connector to establish a secure connection.
Navigate to Apps > Learning > Settings > LTI Connectors.
- Click ADD at the top right.
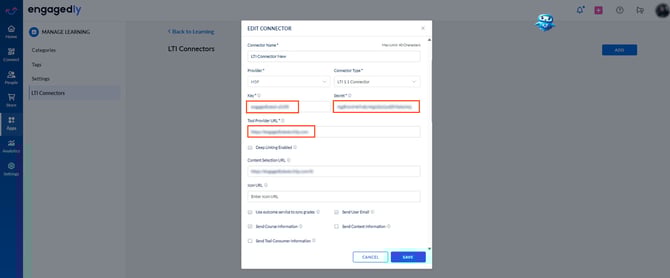
- Enter the connector name as required.
- Open the "Provider" drop-down and select H5P.
- Open the "Connector Type" drop-down and select LTI 1.1 Connector.
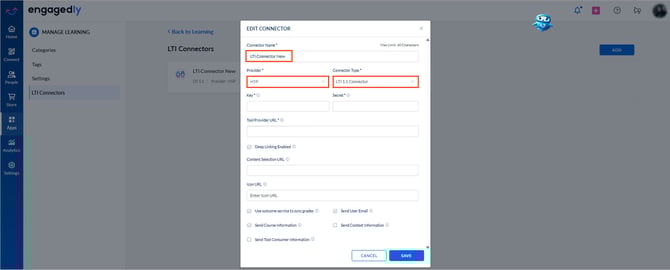
📒Note: Engagedly currently supports LTI version 1.1 only.
Retrieve credentials from H5P
- Go to H5P.
- Select the Manage Organization tab at the top.
- Select Connect LMS from the left navigation menu.
- Copy the Key, Secret, and tool provider URL from H5P.
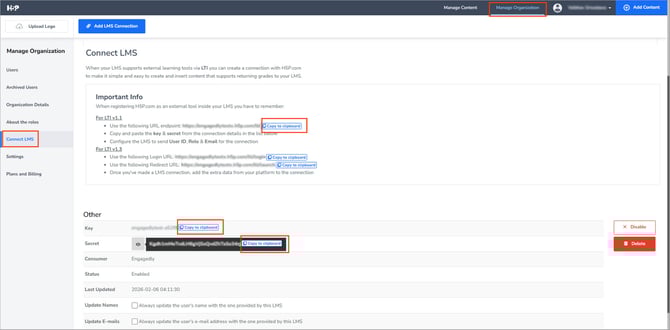
5. Paste these values into their respective fields in Engagedly.
Optional configuration
-
Enable Deep Linking, which allows you to link directly to specific content within H5P.
📒Note: If "Deep Linking" is enabled, the "Content Selection URL" becomes mandatory.
2. Paste the "Content Selection URL", allowing learners to navigate to H5P to access the content.
3. Enter the "Icon URL" to customize the icon. Upload an image representing the LTI connector within Engagedly’s LXP.
A default icon is used if an "Icon URL" is not provided.
4. Enable advanced settings:- Use outcome service to sync grades: When enabled, the data for pass or fail status or test scores linked to the content will be fetched.
- Send Course Information: When enabled, the user can share the course information with H5P.
- Send Tool Consumer Information: When enabled, learners' profile details and other identifiable information are shared with H5P.
- Send User Email: When enabled, the user’s email and name are shared with H5P when they interact with it.
- Sent Context Information: When enabled, the user can share the course context information with H5P.
5. Click SAVE.
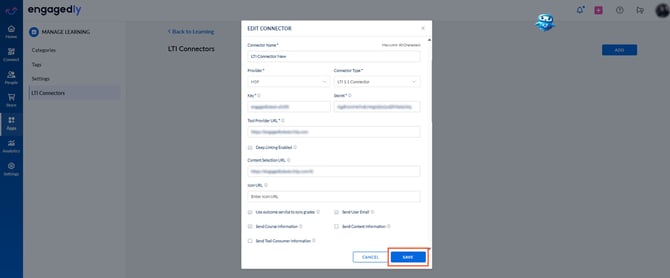
The LTI connector is successfully added to Engagedly.
📒Note: You can add LTI units only when the connector is active.
3.2. Import H5P content to Engagedly
After enabling the LTI connector in Engagedly, you can import H5P content into Engagedly’s LXP.
Navigate to Apps > Learning > Author.
- Click Add at the top right.
- Select Create Course. Learn more in Create a course.
You can also add the LTI unit to an existing course.
After creating a course, add sections to it. Learn more in Add and manage sections and units to a course.
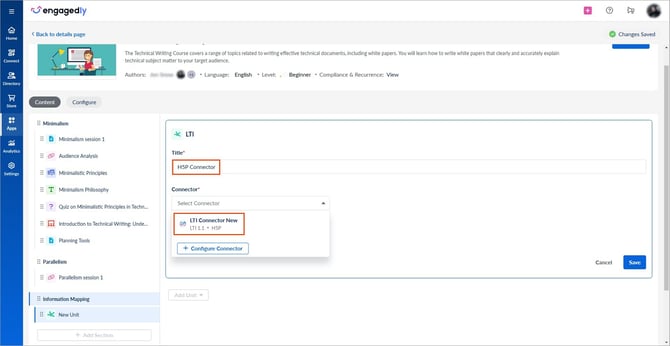
3. In the "Content" tab, select a section where you want to add the unit.
4. Click Add Unit and select LTI.

📒Note: The LTI option appears only if the connector is enabled.
5. Enter the title and select the connector.
If you have not configured a connector, click Configure Connector.
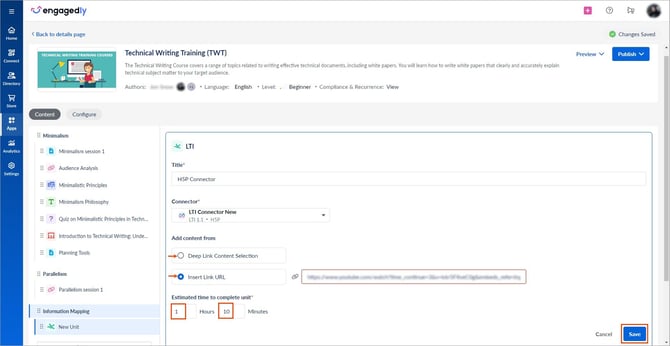
6. Add content using one of the following methods:
|
Deep Link Content Selection |
Insert Link URL |
|
When enabled, it fetches the content from H5P. |
When enabled, it allows you to paste the content link. |
|
a. Select Deep Link Content Selection and click Select Content. It redirects you to H5P. b. Select the content and click Insert. |
a. Select Insert Link URL. b. Copy the content link from its source. c. Paste it into the "Link URL" field. 📒Note: The content link URL must match the tool provider URL. |
After adding content, remove it by clicking the Delete ![]() icon beside it if required.
icon beside it if required.
7. Set the estimated completion time and click Save.
After adding sections and units, publish the course to make it available in the library. Learn more in Create a course.
4. Disable connection
After enabling the LTI connector, manage it at any time.
📒Note: Learners cannot access existing units once the connector is disabled.
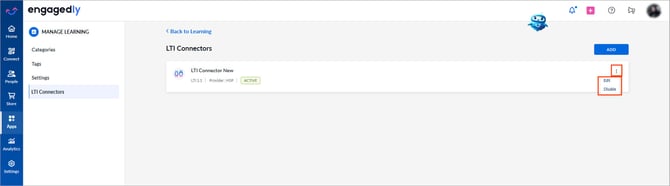
Navigate to Apps > Learning > Settings > LTI Connectors in Engagedly.
- Click the Overflow
 Menu next to the connector.
 - Select Edit, Disable, or Delete as required.
⚠️Warning: After adding an LTI unit to a course, you cannot delete the connector.
To reconnect:
Follow the same steps to enable it, allowing users to access the units.
After integration, learners can seamlessly access H5P content within Engagedly’s LXP. You can track progress and view learning analytics. You can also monitor time spent, course status, and scores or test results (if provided by H5P).
5. Glossary
|
Term |
Meaning |
|
H5P |
An open-source HTML5 platform for creating, sharing, and reusing interactive educational content. |
|
LTI |
LTI (Learning Tools Interoperability) is a standard developed by the IMS Global Learning Consortium that integrates learning platforms with external tools. |
|
LTI connector |
Enables integration between H5P and Engagedly. |
|
Key |
Unique identifier provided by H5P that allows Engagedly to authenticate and establish a connection with H5P. |
|
Secret |
Password used to validate secure communication. |
|
Tool provider URL |
URL of your H5P site. |
|
Content selection URL |
Combines the tool provider URL with "/lti" for deep linking. |