Manage respondents in engagement survey
Authors can add respondents to the engagement survey while sharing it. After sharing it, they can manage respondents by adding and removing them.
Add respondents
You can add individual respondents or in bulk.
Navigate to Surveys > Engagement.
- Click the Filter
 Icon in the ALL ENGAGEMENT SURVEYS field.
 - Click the drop-down and select Authored by You.
- Select an engagement survey where you want to manage respondents.
- In the Assignments tab, click the Overflow
 Menu on an assignment where you want to manage respondents and select Respondents.

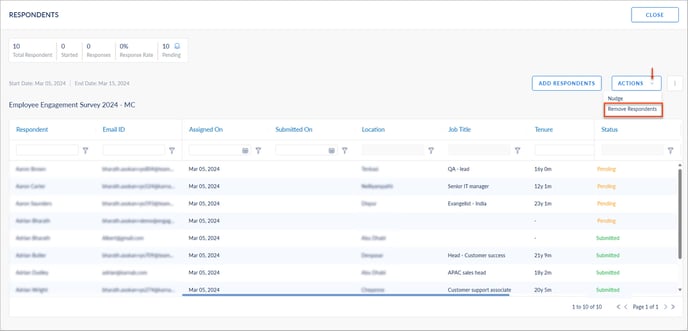
5. Click ADD RESPONDENTS, select the respondents manually or in bulk, and click ASSIGN.

Remove respondents
You can remove individual respondents or multiple respondents.
4. Follow steps 1 to 4.
5. Click the ACTIONS drop-down and select Remove Respondents.
6. Select the respondents manually or in bulk, and click REMOVE.

Hover over the respondent’s name, click the Minus ![]() Icon, and click REMOVE to remove the individual respondent.
Icon, and click REMOVE to remove the individual respondent.
Note: Removing respondents will remove their responses. You cannot recover them.
You can manage the columns and export the respondents' list.
Click the Overflow ![]() Menu at the top right and select the option as required.
Menu at the top right and select the option as required.
- Manage Columns: All active employee fields are available in Manage Columns. However, only the selected fields in the Manage Columns are visible in the AG grid. You can manage the columns as required.
- Export: You can export the employees' information. Only the selected fields in Manage Columns are exported.
After sharing the engagement survey, you can nudge respondents if they have not submitted their responses. Learn more in Nudge respondents.