Integrate Paychex with Engagedly
Table of contents
- Set up Paychex
-
6.1. Sync manually
6.2. Schedule sync
1. Introduction
Integrating Paychex with Engagedly allows the admins to sync all the employees’ information, including custom field data, from Paychex to the Engagedly platform. The integration enables the admins to sync data seamlessly, aiming to improve efficiency, streamline administrative workflows, and enhance functionality, ensuring accurate and timely exchange of employee information. Learn more in Overview of integrations.
Prerequisites- Subscription to Paychex and Engagedly.
- Paychex enabled on Engagedly.
2. Set up Paychex
Admins can integrate Paychex with Engagedly.
Navigate to Settings > Integrations.
- In the HRIS section, click Paychex.

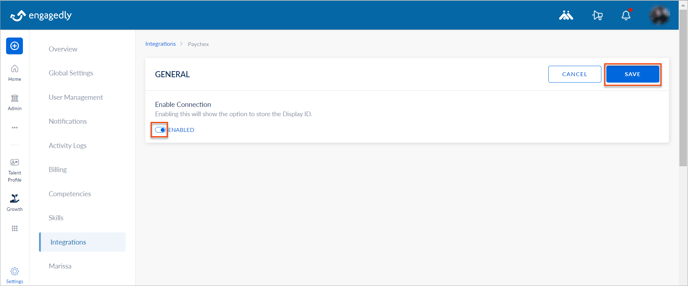
2. Toggle the button to enable Paychex and click SAVE at the top right.
Note: The SAVE option is available only after you enable Paychex.

3. Click + ADD COMPANY in the CONFIGURE COMPANY field.
Note: The CONFIGURE COMPANY field is available only after saving the settings in step 2.

4. Log in to your Paychex account and copy the eight-digit company ID on the homepage.

5. Navigate to the Engagedly platform, paste the eight-digit company ID in the ADD COMPANY pop-up, and click SAVE.

6. Navigate to your Paychex account and click Company Settings on the left pane.
7. Select Integrated apps and select Engagedly.

8. Enable the option I’ve read and agree to the Third Party Terms of Use, and click Approve at the top right.
Note: The user sync process does not occur if you do not agree to the terms of use.

3. Before user sync
If you want to sync any custom fields available on Paychex, email your requirements with the following details to our support team before mapping.
- To enable or disable the following settings on Engagedly as required.
- Block Non-Synced Users
- Blocked User Creation
- Sync Mapped Attributes only
- Which fields are required to sync, and which fields are not.
For example, you may require the first name and last name fields. However, you may not require a middle name field.
- Whether you want to sync:
- Only the active employees
- All active and terminated employees
- All departments, managers, job titles, and location details
You can also add custom fields on Engagedly as required.
By default, the following fields are mapped:
- First Name
- Middle Name
- Last Name
- Employee ID
- Date of Hire
- Job Title
- Department
- Location
- Reporting To
- Birthday Date
- Employee Type
- Gender
4. After user sync
After you complete the setup and share your requirements on field mapping, you receive an email notification from our support team, informing you to add or update users on Paychex and initiate the sync process.
After initiating the user sync process, you receive an email regarding the sync update.
After every successful sync, the newly added users receive an email with credentials and a link to set their password, allowing them to log in to Engagedly.
After every sync, the employees’ details are automatically updated on the Engagedly platform.
5. Set up identifier
By default, the email ID serves as the primary unique identifier.
Choose a unique identifier, either the employee ID or the employee’s email ID.
Contact our support team if you prefer to use the employee ID as the primary unique identifier.
6. Sync process
After setting up Paychex integration on Engagedly, initiate the user sync process manually or schedule it as required. After initiating the user sync process, you receive an email regarding the sync update.
6.1. Sync manually
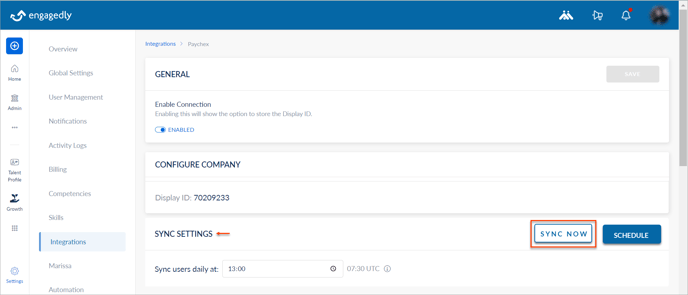
After adding users on Paychex, sync them to import into the Engagedly platform.
- Add users on Paychex.
- Navigate to Engagedly.
- In the SYNC SETTINGS field, click SYNC NOW.

6.2. Schedule sync
After adding users on Paychex, schedule the user sync on Engagedly as required.
- In the SYNC SETTINGS field, click the Clock
 Icon.
Icon. - Set the timing for daily user sync and click SCHEDULE.

Note: The system converts the time you set to UTC and then initiates the user sync process.
7. Disable connection
Disable the Paychex connection with Engagedly at any time if required.
Note: If you disable the Paychex integration, both manual and scheduled user sync processes do not occur.
Navigate to Settings > Integrations.
- In the HRIS field, click Paychex.
- Toggle the button to disable Paychex and click SAVE at the top right.
