Admins can create surveys based on their organization's requirements.
Any employee can create a survey only when admins enable the permission in the survey settings. For more information, refer to the Surveys user guide for admins.
Admins can assign the “Survey Manager” role to employees to create and manage general surveys. For more information, refer to Add and manage roles and permissions.
Choose a survey creation method
| Requirement | Method |
| Use predefined survey questions | Create using a template |
| Create a customized survey | Create a survey from scratch |
| Generate AI-curated survey questions | Use Marissa AI |
All methods begin from: Navigate to Surveys > General.
Create a survey using a template
Engagedly offers predefined survey templates in the “Template Library”. Admins can also create custom templates based on organizational needs and add them to the library.
Note: For surveys created from a template, the co-author option is available in edit mode. To add co-authors, refer to Manage a survey.
Option 1: Use the template directly
- Click EXPLORE at the top to open the template library.
- Click USE THIS TEMPLATE on the required template to create a survey.
- Configure additional settings.
Option 2: Preview before using
- Click EXPLORE at the top to open the template library.
- Click the template name to view its sections and questions.
- Click PREVIEW to view how the survey appears to employees.
- Click USE THIS TEMPLATE at the top right to create the survey.
- Configure additional settings.
- Click LAUNCH at the top right and click Using Template.
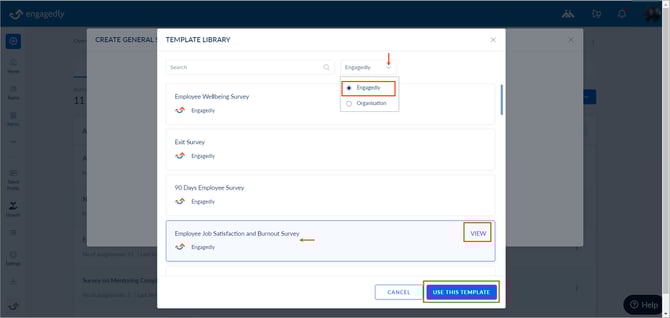
- Open the drop-down and select a template library: Engagedly and Organisation.
- Hover over the template and click VIEW to preview how the survey appears to employees.
- Click the template to select it, and then click USE THIS TEMPLATE.
- Configure additional settings.
Configure additional settings (applies to all template options)
- Update the survey name.
- Update the description or click the Marissa
-4.png?width=18&height=20&name=Marissa%205@2x%20(2)-4.png) icon to generate it.
icon to generate it. - Enable Make responses anonymous to ensure that responses remain anonymous for both admins and survey managers.
- Update the “Anonymity Threshold” if required. This option is available only when “Make responses anonymous” is enabled.
- Select Allow managers to view responses from their direct reports.
- Select Enable questionnaire randomization to automatically shuffle questions for each respondent.
- Update the thank-you message.
- Click CREATE to save the settings.
📒Notes:
- You cannot set the anonymity threshold below two.
- Admins must contact our support team to enable the “Allow managers to view responses” setting for their organization.
⚠️Warning: Lowering the anonymity threshold may make it easier to identify individual respondents. Proceed with caution.
Create a survey from scratch
You can create a survey with questions tailored to your organization’s needs.
- Click LAUNCH at the top right and click Create from Scratch.
- Enter the survey name.
- Enter the description or click the Marissa
-3.png?width=18&height=20&name=Marissa%205@2x%20(2)-3.png) icon to generate it.
icon to generate it. - Enable Make responses anonymous to ensure that responses remain anonymous for both admins and survey managers.
- Update the “Anonymity Threshold” as required. Responses are visible only after the specified threshold is reached. This option is available only if “Make responses anonymous” is enabled.
- Select Allow managers to view responses from their direct reports.
- Select Enable questionnaire randomization to automatically shuffle questions for each respondent.
- Search and select other admins or survey managers as co-authors.
- (Optional) Update the thank-you message.
- Click CREATE to save the settings.
Notes:
- You cannot set the anonymity threshold below two.
- Admins must contact our support team to enable the “Allow managers to view responses” setting for their organization.
⚠️Warning: Lowering the anonymity threshold may make it easier to identify individual respondents. Proceed with caution.
After creating the survey, you are redirected to the “Questionnaire” page, where you can add and manage sections. For more information, refer to Add and manage sections in a survey.
Create a survey with Marissa
You can create a survey with AI-curated survey questions based on your needs.
- Click LAUNCH at the top right and Click Get Marissa Suggestion.
- Enter the survey insights and click GENERATE.
Click GENERATE multiple times to refine the suggestions. - Click CREATE.
Based on the survey title, Marissa generates questions.
- Add survey insights to refine the questions and click REGENERATE.
- Click the Marissa icon next to a question to rephrase it.
- Select the required questions and click ADD.
After adding the questions, you are redirected to the “Questionnaire” page, where you can add and manage sections. For more information, refer to Add and manage sections in a survey.