Share survey
After creating a survey, authors can share it with anyone, both internal audiences within the organization and external audiences.
Note: Anyone can create and share surveys if the admin has given them permission. Learn more about roles and permissions in the Surveys user guide for admins.
Surveys are shared through assignments. After creating an assignment, you can add employees to it at any time.
Note: You cannot manually add respondents for the "Post the survey on social" and "Generate a public URL" assignment types. Respondents are added automatically when they click the link or scan the QR code.
The following assignment types are available. Select the one that suits your requirements:
- Share with employees: Share the survey with selected employees within your organization.
- Post on social: Share the survey with selected employees by posting it on the social module.
- Invite through email: Share the survey with specific audiences through email.
- Generate a public URL: Generate a public link and a downloadable QR code to share the survey with anyone.

Navigate to Surveys > General.
- Click the Filter
 Icon in the ALL SURVEYS field.
 - Click the drop-down and select Authored by You.
You can also share surveys authored by others.
3. Select a survey you want to share.

4. Click SHARE SURVEY at the top right.
5. Select the assignment type.
Share survey with employees
You can share the survey with selected employees within the organization.
5. Follow steps 1 to 4.
6. Select Share with the employees.
7. Type the assignment title and set the start date.
You can perform the following actions as required:
- Set the end date.
If you do not set the end date, the assignment will remain active forever.
Note: Setting the survey end date is necessary to send reminder notifications to the respondents.
- Select Get notified when respondents submit the survey.
Note: A survey should be non-anonymous to get notified when respondents submit it.
- Set award points to award employees on survey completion.
- Set the approximate time for survey completion.
- Modify the email message.
8. Click CREATE.
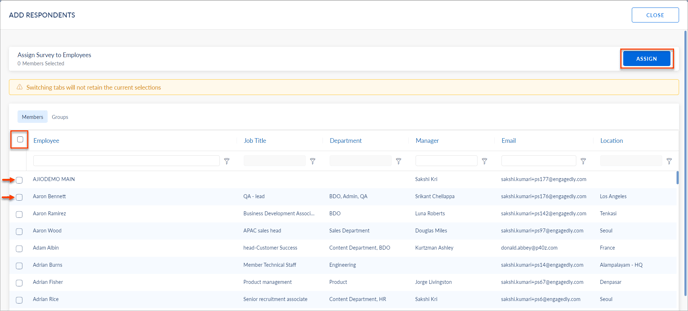
9. Select the employees and click ASSIGN.
You can click the box beside Employee to select all employees or click the box beside individual employee names to select them manually.

Post survey on social
You can share the survey as a post on the social feed.
5. Follow steps 1 to 4.
6. Select Post the survey on social.
7. Type the assignment title and set the start date.
You can perform the following actions as required:
- Set the end date.
If you do not set the end date, the assignment will remain active forever.
Note: Setting the survey end date is necessary to send reminder notifications to the respondents.
- Set award points to award employees on survey completion.
- Set the approximate time for survey completion.
8. Click CREATE.
By default, the post type Share Status is selected.
You can enter tags, which helps to filter particular posts.
9. Search and select respondents in the Share With field, and click POST.
Note: The survey link will auto-generate in the social post.

Note: The respondents are added to the Respondents field when they click the link.
Invite through email
You can share the survey within and beyond the organization with specific audiences through email.
5. Follow steps 1 to 4.
6. Select Invite through Email.
7. Type the assignment title and set the start date.
You can modify the email subject and the body if required.
8. Click CREATE.
Note: The link to the assignment will be attached at the end of the email body.
Or
Click the Download ![]() Icon, open the downloaded file, update the fields in it, save the file, and click UPLOAD to add the email IDs of the respondents in bulk.
Icon, open the downloaded file, update the fields in it, save the file, and click UPLOAD to add the email IDs of the respondents in bulk.
10. Click ASSIGN.

Generate a public URL
You can share the survey by generating a public URL.
5. Follow steps 1 to 4.
6. Select Generate a public URL.
7. Type the assignment title and set the start date.
You can copy the auto-generated URL or download the QR code to share it with anyone, both inside and outside the organization.
8. Click CREATE.
Note:
- If you download the QR code without creating the assignment, it does not work.
- When respondents click the link or scan the QR code, they are automatically added to the Respondents field.
- When you share the survey with a public URL or QR code, respondents appear as Respondent 1, Respondent 2, and subsequent numbers, irrespective of whether the survey is anonymous. Their details are not captured.
After sharing the survey, you can:
- View the ACTIVE status, start date, end date (if set), and assignment type on each assignment in the Assignments tab.
- Manage it by editing, setting recurrence, closing, opening, and deleting. Learn more in Manage survey.
- Manage the respondents by adding and removing them. Learn more in Manage respondents.