Create course
Tutorial ![]()
By default, any employee in the organization can create courses if admins give them access. Learn more in the LXP user guide for admins.
Note: Only admins and learning managers can create learning paths or import learning.
Authors can create learning in the following ways:
You can also import courses from Engagedly Academy or other learning applications, such as Udemy, LinkedIn Learning, BizLibrary, and Go1, if your organization has integrated with them. Learn more in Import courses from integrated applications.
Note: Only admins and learning managers can import courses from integrated learning applications.
|
For Engagedly V1, navigate to Learning from the top.
|
For Engagedly V2, navigate to Apps on the left pane and select Learning.
|
Create course
Create a course from scratch and customize it as required.
- At the top right, click Manage Resources and then click Add.
- Select Create Course.
- Type the course title.
Note: The Marissa ![]() icon appears only after you type the course title.
icon appears only after you type the course title.
If required, you can
- Upload the cover photo for the course.
- Click the Marissa
.png?width=18&height=20&name=Marissa%205@2x%20(2).png) Icon to generate a description, or enter it manually.
Icon to generate a description, or enter it manually.
4. Click Save.

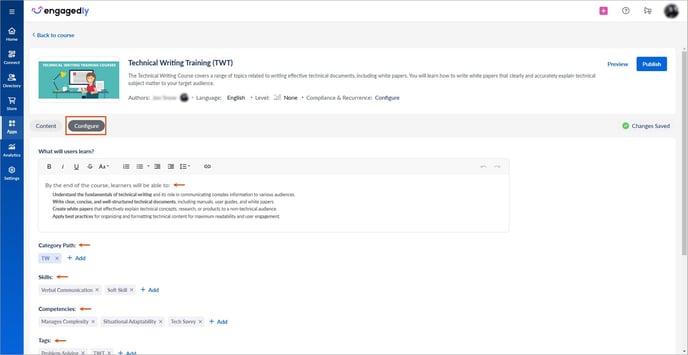
The course is successfully created, redirecting you to the course edit page, where you can manage the course content in the Content tab and configure course settings in the Configure tab.
In the Content tab, perform the following actions:
- Edit the author.
- Add a co-author.
- Specify the language and level.
- Configure the compliance settings.
- Add sections and units.
- Publish the course.
Note: You can add co-authors for those who have the learning manager's permission. Learn more in the LXP user guide for admins.
All fields are in-line edits. Click a field to make the necessary changes.

In the Configure tab, perform the following actions:
- Add learner outcomes.
- Add category path, skills, competencies, and tags.
Note: You can view the categories, skills, competencies, and tags that are added to your organization.

- In the Completion Behavior step, customize settings for before and after course completion.
- Select Randomly or Sequentially, allowing learners to complete the units.
- Decide when the learners can mark the course as completed.
Note: If you enable the After manual evaluation option, learners cannot mark the course as completed until you evaluate it. You can evaluate learners in the Evaluation Status or Scores fields located in the Learners tab, which automatically marks their course status as completed.
-
- Enable Award points and Award certificate if required.
- Toggle the button to enable Comments, Ratings, or both.
Notes:
- Learners do not receive points for the course because course-level completion points are disabled at the global level. To enable points, learn more in View available activities for activity badge.
- If you enable only ratings, learners must rate the course.
- If you enable only comments, learners must comment on the course.
- If both ratings and comments are enabled, learners must rate the course but can skip commenting.

The changes are auto-saved.
Utilize existing courses
Utilize the existing courses, updating them efficiently to align with organizational objectives, saving time and effort in the content development process.
- At the top right, click Manage Resources and then click Add.
- Select Utilize existing courses, and then select Authored by you at the top.
- Hover over the course and click Preview to view its content if required.
- Select the course and click Use.
You are redirected to the course edit page, where you can manage the course content in the Content tab and configure course settings in the Configure tab.
After creating a course, add sections and units to it. Learn more in Add and manage section and unit.
Once sections and units are added, publish the learning path and push it to the library. Learn more in Publish course.
After creating a course, manage it if required. Learn more in Manage course.

