
Table of contents
- Introduction
- User actions
- Log in to the mobile app
- Access profile
- Access home page
- Quick actions
- Access social
- Access directory
- Access apps
1. Introduction
Engagedly’s mobile application gives you a holistic experience, allowing you to perform frequent actions anytime. It has improved by bringing information architecture and consistency to navigation in the mobile application. It offers an instant solution for modules like Feedback, Groups, Notes, Surveys, Team Pulse, Goals, Learning, Growth, Resources, and 360 Feedback.
2. User actions
You can perform the following actions on your mobile:
- Stay updated with notifications and pending actions
- View posts and praises on social
- View posts in groups
- View upcoming birthday and work anniversary celebrations
- Access the organization directory
- View the profile of other employees
- Connect with your team using their contact information
- Share and request feedback
- Create and share quick notes
- Respond to the surveys
- Submit team pulse responses
- View active and aligned goals, key results, and add comments
- Enroll and take the courses and learning paths
- Create, edit, check-in, and delete IDP
- Link courses to IDP
- Add milestones and attachments to IDP
- Respond to the career aspirations survey
- View and edit the submitted response to a career aspirations survey
- View and download files in resources
- Share 360 Feedback and nominate others to give you feedback
- View responses received for 360 Feedback and download the report
3. Log in to the mobile app
You can download the application on your mobile, tablet, or iPad using the below QR code.
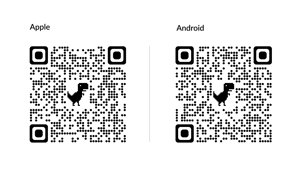
- Download the Engagedly 2.0 application on your mobile.
Note: You can also use the Play Store for Android mobile and the App Store for iPhone to download the application.
2. Copy only the subdomain of your organization's URL.
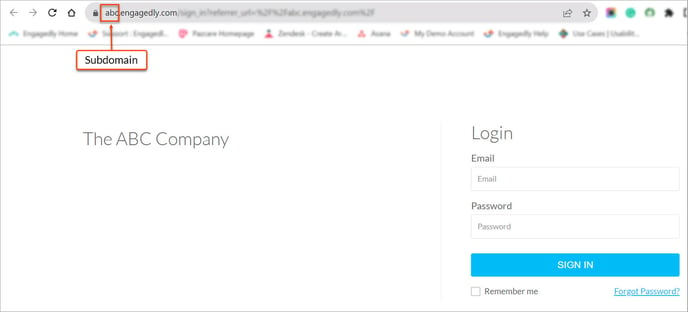
3. Paste the subdomain of your organization's URL on the Engagedly mobile app and click Next.

4. Enter your email ID, click Continue, and enter your password.
Note: You can log in using your ADP or Azure AD SSO credentials if they are enabled for your organization.
5. Click Login.
Note: If you forget your password, click Forgot Password on the login screen, enter your email ID, and click Submit to receive a reset link.
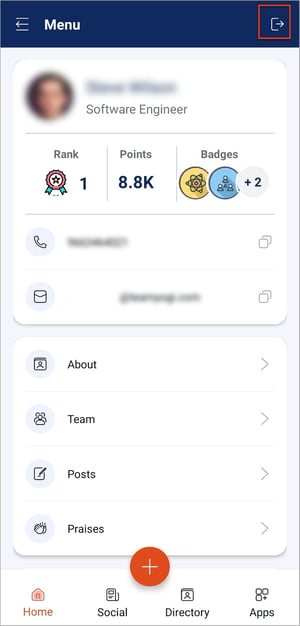
4. Access profile
You can access your profile to view the following:
- Photo
- Name
- Job title
- Rank
- Points
- Badges
- Contact details
- About yourself
- Team details, including your manager and your direct reports, if any
- Posts and praises
You can click Support to email our support team.
At the top right of the menu, click the Log Out ![]() Icon to exit the mobile application.
Icon to exit the mobile application.
5. Access home page
After logging in, you will arrive at the home page. At the bottom of the screen, you can view Home, Social, Directory, and Apps.
In home, you can view the
- Notifications
- Click the Bell
 Icon at the top right to view the notifications.
 - Click any notification that redirects you to the respective page.
- Click the Bell
- Pending actions
- Click any pending action that redirects you to the respective page.
- Social feed: You can view the latest three posts on the home page (including the pinned posts if you have any).
- Click any posts to view the updates.
- Groups: You can view My Groups if you are a part of them.
- Click any group to view the posts in it.
- Click View More to view My Groups and Other Groups in the organization.
You can view open and interest groups in the Other Groups.
You can filter the groups based on their type.
Note: Only the admin can view the closed groups.
- Birthday and work anniversary celebrations
- Click Birthday or Work Anniversary to view the upcoming birthdays or work anniversaries of employees within the organization.
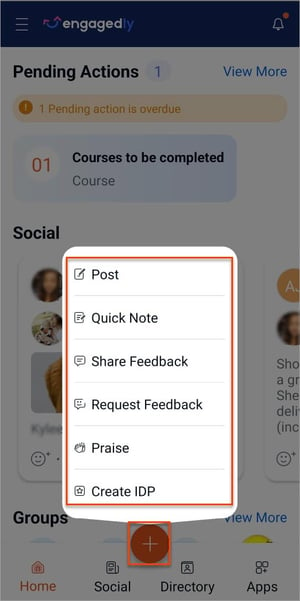
6. Quick actions
You can perform quick actions without navigating to the respective modules.
- At the bottom of the screen, click the Plus
 Icon for additional actions.
- Click Post to create a post on Social.
- Click Quick Note to create a note about any employees for your reference.
- Click Share Feedback to share the feedback about employees.
Note: You can notify their respective managers and be anonymous while sharing feedback.
-
- Click Request Feedback to request feedback about yourself or others from anyone in the organization.
- Click Praise to praise anyone in the organization and post it on Social.
- Click Create IDP to create an individual development plan.
7. Access social
You can view the posts on social.
-
- At the bottom of the screen, click Social.
At the top right,
-
- Click the Search
 Icon to search the posts by name, tags, and keywords.
 - Click the Filter
 Icon to filter the posts based on recent posts, popular posts, post type, and location.
- Click the Search
You can view social posts, like them, comment on them, add reactions, and pin them.
You can edit and delete your comments on any post.
-
- Click Comment on a post where you have commented, and click the Overflow
 Menu for additional actions like edit and delete.
 - Click the Overflow
 Menu on the post you have created and select Edit, Delete, and Pin Post as required to edit, delete, and pin the post, respectively.
- Click Comment on a post where you have commented, and click the Overflow
Note: You can pin the posts that others have created. However, you cannot edit or delete them.
8. Access directory
You can view all the employees’ names, designations, and contact details.
-
- At the bottom of the screen, click Directory.
- Click the Call
 Icon to call, message, or copy the phone number of the employee.
 - Click the Email
 Icon to send an email or copy the email address.
 - Click the employee’s name to view their profile.
9. Access apps
You can view the different modules available on the mobile application, like
However, admins and managers have specific functionalities within certain modules. Learn more in Admin features in the mobile app and Manager features in the mobile app.
At the bottom of the screen, click Apps and navigate to the respective module as required.

Feedback
Feedback allows you to receive valuable insights, celebrate achievements, and contribute to your professional development. Learn more in Introduction to Feedback.
Navigate to Apps > Feedback.
You can view the feedback wall, praise wall, and request tabs.
You can perform the following actions in Feedback:
Feedback and praise wall
The Feedback Wall displays all the feedback you have received and that you have requested for other employees.
The Praise Wall displays all the public praises that you and other employees of the organization received.
Click the Filter ![]() Icon at the top right to filter the feedback on the Feedback Wall and praises on the Praise Wall based on type, duration, and whether they are about you or others.
Icon at the top right to filter the feedback on the Feedback Wall and praises on the Praise Wall based on type, duration, and whether they are about you or others.
Click the Overflow ![]() Menu on the feedback or praise that you have shared about others and select Edit or Delete as required.
Menu on the feedback or praise that you have shared about others and select Edit or Delete as required.

Add and manage comments on feedback and praise
You can comment on the feedback and praise that you share.
Click the feedback or praise, click Add comments, type the comment, and click ADD.
You can edit or delete your comments.
Open your comment on the feedback or praise, click the Overflow ![]() Menu, and select Edit or Delete as required.
Menu, and select Edit or Delete as required.
Feedback requests
The Request tab displays incoming, outgoing, and ignored feedback.
Incoming is receiving feedback requests from others to give your feedback.
Outgoing is requesting others to give feedback about yourself.
Ignored is receiving feedback requests from others that you have ignored.
Click the drop-down at the top left and select Incoming, Outgoing, or Ignored as required.

Click the Filter ![]() Icon at the top right to sort the feedback requests by their status, such as Pending or Responded.
Icon at the top right to sort the feedback requests by their status, such as Pending or Responded.
Groups
Groups empower you by providing a platform to collaborate with colleagues who share similar interests, making personal and professional growth easier. Learn more in Introduction to Groups.
Navigate to Apps > Groups.
You can view the
- My Groups tab if you are a part of it.
- Other Groups tab to join the open group if required.
You can perform the following actions in Groups:
View my groups
Click the Filter ![]() Icon at the top to filter the Open, Closed, and Interest groups.
Icon at the top to filter the Open, Closed, and Interest groups.
Click the Search ![]() Icon at the top right to search for the groups by name.
Icon at the top right to search for the groups by name.
Open any group, click the Overflow ![]() Menu at the top right, and click View Information.
Menu at the top right, and click View Information.
You can leave the group if required.
In Group Info, click the Overflow ![]() Menu at the top right and click Leave.
Menu at the top right and click Leave.

You can view the posts in a group, like them, comment on them, edit your comments, and delete them.
View other groups
In the Other Groups tab, you can join any group.
Open any group, click the Overflow ![]() Menu at the top right, and click View Information.
Menu at the top right, and click View Information.
In the Group Info, click Join Group.

After joining the group, you can cancel your request.
Click the Overflow ![]() Menu and click Cancel Request.
Menu and click Cancel Request.

Notes
Notes empower you to capture, organize, and share information effectively, contributing to improved collaboration, communication, productivity, and personal development within the organization.
Add and manage notes
At the bottom of the screen, click the Plus ![]() Icon to add a note for your reference.
Icon to add a note for your reference.
You can view the notes that you have created.
Navigate to Apps > Notes.
Click the note to view its information.
Click the Overflow ![]() Menu and select Edit or Delete as required.
Menu and select Edit or Delete as required.

Surveys
Surveys empower you by providing a platform to share valuable feedback, fostering engagement, satisfaction, and positive change. Learn more in Introduction to Surveys.
You can perform the following actions in Surveys:
View survey
You can view the pending, submitted, and missed surveys.
Navigate to Apps > Surveys.
Click the Filter ![]() Icon at the top right and select the survey status Pending, Submitted, or Missed as required.
Icon at the top right and select the survey status Pending, Submitted, or Missed as required.

Submit response
Open the pending survey, type your response, and click SUBMIT.
Note: After submitting the survey, you cannot edit your responses.
You can view your responses in the submitted surveys.
Team Pulse
Team Pulse empowers you by providing a platform to voice your concerns, interact with managers, and feel valued and heard. It fosters engagement, satisfaction, and positive change. Learn more in Introduction to Team Pulse.
You can perform the following actions in Team Pulse:
Submit response
You receive the notification when the admin launches Team Pulse. You can submit your responses and edit them until the pulse submission date ends.
Navigate to Apps > Team Pulse.
You can view the My Pulse tab.
Click the Period drop-down and select the period as required.
Type your responses and click Submit.

View history
You can view the history of your responses to each question and add comments if required.
Click View History on any question.
Initiate conversation
Each question has a Comment option, where you can initiate a conversation about the particular question.
Click Comment to initiate a conversation, type your comment, and click the Send ![]() Icon.
Icon.
Note: You can view the Comment option only after you submit your response.

Edit response
You can edit your responses if required.
Click the Edit ![]() Icon at the top right.
Icon at the top right.
Note: You cannot edit your responses once the review period begins, as the managers review your responses.
Click the Overflow ![]() Menu at the top right and click View Report to view the Response & Review Rate.
Menu at the top right and click View Report to view the Response & Review Rate.

Goals
Goals are specific objectives that you aim to achieve within a set timeframe. They help you by setting clear expectations, allowing you to track progress, receive feedback, stay aligned with organizational objectives, and improve performance. Learn more in Introduction to Goals.
Navigate to Apps > Goals.
You can perform the following actions in Goals:
Note: Depending on the version of Goals being used on Engagedly's website, you can access the same versions on the mobile application.
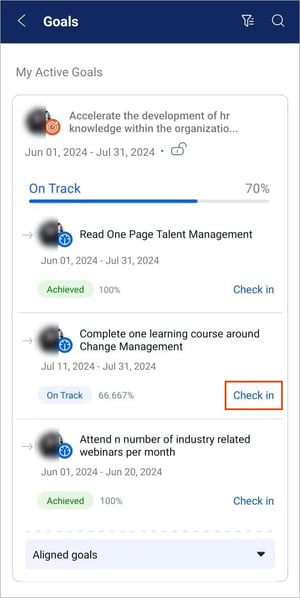
View goals
The My Active Goals tab displays the active goals along with their key results, duration, alignment, and visibility.
At the top right,
- Click the Filter
 Icon to filter the goals based on their status.
 - Click the Search
 Icon to search for goals.
You can view the details of a goal, including its key results, contributors, and any attachments.
Click a goal or key result to view its details.

Update goals
You can view goals and update their progress anytime.
- Click Check in on a key result.
- Enter the value to update the key result.
- Type your comments if required and click Save.
After adding a comment, you can manage it.
Press and hold your comment, and select Edit or Delete as required.
Add and manage comments
You can add comments to a goal and view them.
- Click a goal.
- Type your comment in the Comments field, and click the Send
-1.png?width=20&height=20&name=send%20(1)-1.png) Icon to post it.
Icon to post it.

You can also add comments on the key results.
- Click a key result.
- Type your comment in the Comments field, and click the Send Icon to post it.
After adding a comment to a goal or key result, you can manage it.
Press and hold your comment, and select Edit or Delete as required.

On the Goal Details page, click the History ![]() Icon at the top right to view the goal history from the date of its creation.
Icon at the top right to view the goal history from the date of its creation.
Learning
Learning empowers you to take ownership of your learning and development, acquiring new skills and knowledge relevant to your roles. It fosters a culture of continuous learning and innovation, contributing to job satisfaction and success. Learn more in Introduction to LXP.
You can perform the following actions in Learning:
My learning
You will receive an in-app notification and pending action if the course is assigned to you.
Navigate to Apps > Learning > My Learning.
You can view only the active learnings in the My Learning tab.
Active learning refers to the course or learning path you are assigned or enrolled in.
You can view the learning title, progress, and author information.
Click Start or Resume to initiate and continue learning, respectively.

Learning information
Click any learning to view its information.
You can view the following tabs for each learning:
- Contents: It includes the sections and units of the course. Each unit displays its title, duration, and status.
- Reviews: It includes the course reviews.
- Info: It includes the course information and description.

Click each unit in the Contents tab to complete it.
In the quiz unit, you can respond and submit your responses.
In the training sessions unit, you can register if the author adds you to them.
After completing the unit, click Mark Unit as Complete.

Explore learnings and view calendar
You can perform the following actions in the My Learning tab:
- Click the Explore
 Icon to explore all the courses published in the organization.
You can view the course title, duration, and reviews.
Click the Filter ![]() Icon to search for the learnings based on your requirements.
Icon to search for the learnings based on your requirements.
Select a learning to view its information and description.
Click Enroll Now to enroll in the learning.

- Click the Calendar
 Icon to view your learning calendar and stay notified about the due dates for courses, learning paths, and training sessions.
 - Click the Sort
 Icon to sort the courses as active and completed.
 - Click the Search
 Icon to search the courses based on their title to initiate learning.

Add and manage review
In the Reviews tab, click Add review if the admins enable review for the course.

Give ratings, type your comments, and click Submit.
Note: You can enable Be Anonymous if required.
You can manage your review if required.
Click the Overflow ![]() Menu on your review and select Edit or Delete as required.
Menu on your review and select Edit or Delete as required.

Unenroll from learning
You can unenroll from a learning if required.
Click the Overflow ![]() Menu at the top right and click Unenroll.
Menu at the top right and click Unenroll.
Note: You cannot unenroll from the learning assigned to you.

Growth
Growth empowers you to take ownership of your development, progress in your career, and achieve personal and professional success. Learn more in Introduction to Growth.
You can perform the following actions in Growth:
View my IDP
If you have created any IDPs, you can view them, including their status, milestones count, and due details.
Navigate to Apps > Growth > My IDP.
At the top right,
- Click the Plus
 Icon to create IDP, type the necessary details, and click Save.
 - Click the Filter
 Icon to filter IDPs based on their status, like Not Started, Active, On Hold, and Completed.
 - Click the Search
 Icon and type the keywords to search the IDPs.
 - Click the Bulb
 Icon to perform the following:
- To learn about the growth process.
- Watch the video to understand the overview of IDP.
- Download the IDP best practices.

Add and manage IDP
Click the Overflow ![]() Menu at the top right of each IDP for additional actions, like add milestones, mark it as complete, edit it, put it on hold, and delete it.
Menu at the top right of each IDP for additional actions, like add milestones, mark it as complete, edit it, put it on hold, and delete it.
If required, you can add texts, attachments, courses, and learning paths to the milestones. You can edit the milestones, delete them, and mark them as complete.
Note: You cannot edit or delete the IDP if your manager or the admin has created it. However, you can add milestones to it, mark it as complete, and put it on hold.

Career aspiration
Admins can launch the career aspiration survey within the organization. You receive the notification on the Engagedly mobile application when they launch it. You can respond to it from your mobile.
Navigate to Apps > Growth > My IDP.
- Click Start on the Career Aspiration pop-up.
- Click Next to move to the next questions in the aspiration survey.
- Click Submit to submit your responses.

You can view and edit your responses if required.
- Navigate to My Aspirations.

2. Click the Edit ![]() Icon for a question where you want to edit your response.
Icon for a question where you want to edit your response.
3. Edit your response and click Submit.
Note: Your manager receives a notification if you edit your response to the Role Satisfaction question.

You can view your response history for each question. However, you cannot edit your responses in the View History tab.
Click View History on any question.
Resources
Resources serve as a document repository for storing, organizing, and accessing various documents in an organization. It gives you an efficient way to view and download them on your mobile. Learn more in Add files and folders in Resources.
Navigate to Apps > Resources.
You can view files in the grid and list view.
Click the List View ![]() Icon at the top right to change the view of folders and files.
Icon at the top right to change the view of folders and files.

Click the folder to view the files.
Click the file to download it to your mobile.
Note: You can view the files and folders in Resources as sorted by the admin.
360 Feedback
360 feedback, also known as multi-rater feedback, involves sharing and receiving structured feedback anonymously from managers, direct reports, peers, and others within the organization. Learn more in Introduction to 360 Feedback.
Navigate to Apps > 360 Feedback.
You can perform the following actions in 360 Feedback:
Share feedback
The To Be Shared field displays the feedback requests you have received from others.
Swipe left to view the latest requests.
Click View more to view all requests.
You can
- Click Decline to decline others' requests, or
- Click Start to provide them feedback.

Click the Overflow ![]() Menu at the top right and select the options as required.
Menu at the top right and select the options as required.
- Select Instructions to view the 360 Feedback cycle instructions.
- Select Decline to decline the request.
If you start providing feedback, type your responses and click Submit.
If you decline, type your reason and click Save.
Note: You can decline the request if the admin enables the setting that allows respondents to decline 360 Feedback requests.
Nominate others to give feedback
The Nominations field displays the cycle that allows you to nominate others to provide feedback about you.
Swipe left to view the latest cycles.
Click View more to view all cycles.
You can
- Click Dismiss if you do not want to nominate and view that cycle, or
- Click Nominate, search and select the respondents, and click Save to nominate them.

Note:
- Based on the cycle settings, the system automatically includes the manager and peers, or you can manually add them to provide feedback about you.
- If admins nominate anyone to provide feedback about you, you cannot remove their names.
View and download reports
The Received field displays a list of cycles.
Click the Download ![]() Icon on a particular cycle to view and export your 360 Feedback report.
Icon on a particular cycle to view and export your 360 Feedback report.
The report opens in a web browser.

You can download the mobile application for a seamless journey to a more connected and streamlined work experience.